

Поделитесь своей Notion-страницей
Бесплатный Personal Plan позволяет публиковать любую страницу в открытом доступе.

Скриншот: Notion
Нажмите кнопку Share и передвиньте тумблер Share to web.
Доступ к странице в интернете будет только по прямой ссылке: обратите внимание, что копировать её нужно именно из этого меню, а не из строки браузера.
Бесплатный тариф разрешает открыть редактирование или комментирование страницы — это полезно, если вы пользуетесь Notion как текстовым редактором и, например, хотите отдать на правки пост в блог.
Индексирование поисковыми системами в бесплатном индивидуальном плане подключить не получится.
Больше о личной эффективности
- База знаний дизайнера: инструменты, карьера и книги
- Четыре помидорки и лягушка: тайм-менеджмент для дизайнера
- Горящие дедлайны: тайм-менеджмент в дизайн-команде
- Омерзительная семёрка: заказчики, с которыми не стоит иметь дел
- Войти в зону комфорта: как правильно общаться с заказчиком
- «Ничего не хочу делать»: 7 признаков того, что у вас синдром выгорания
Additional FAQs
Here are the answers to more of your questions about Notion calendars.
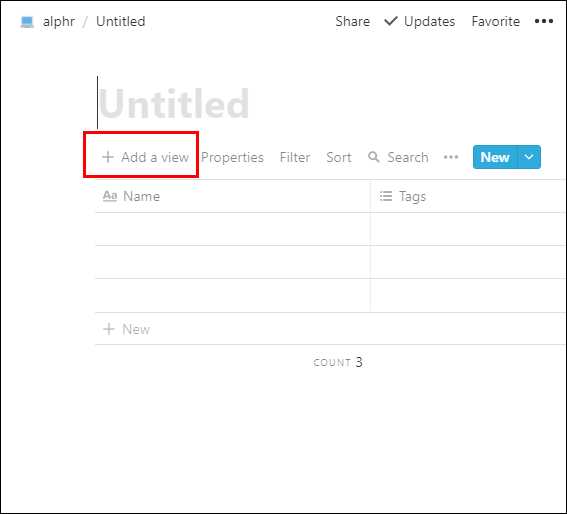
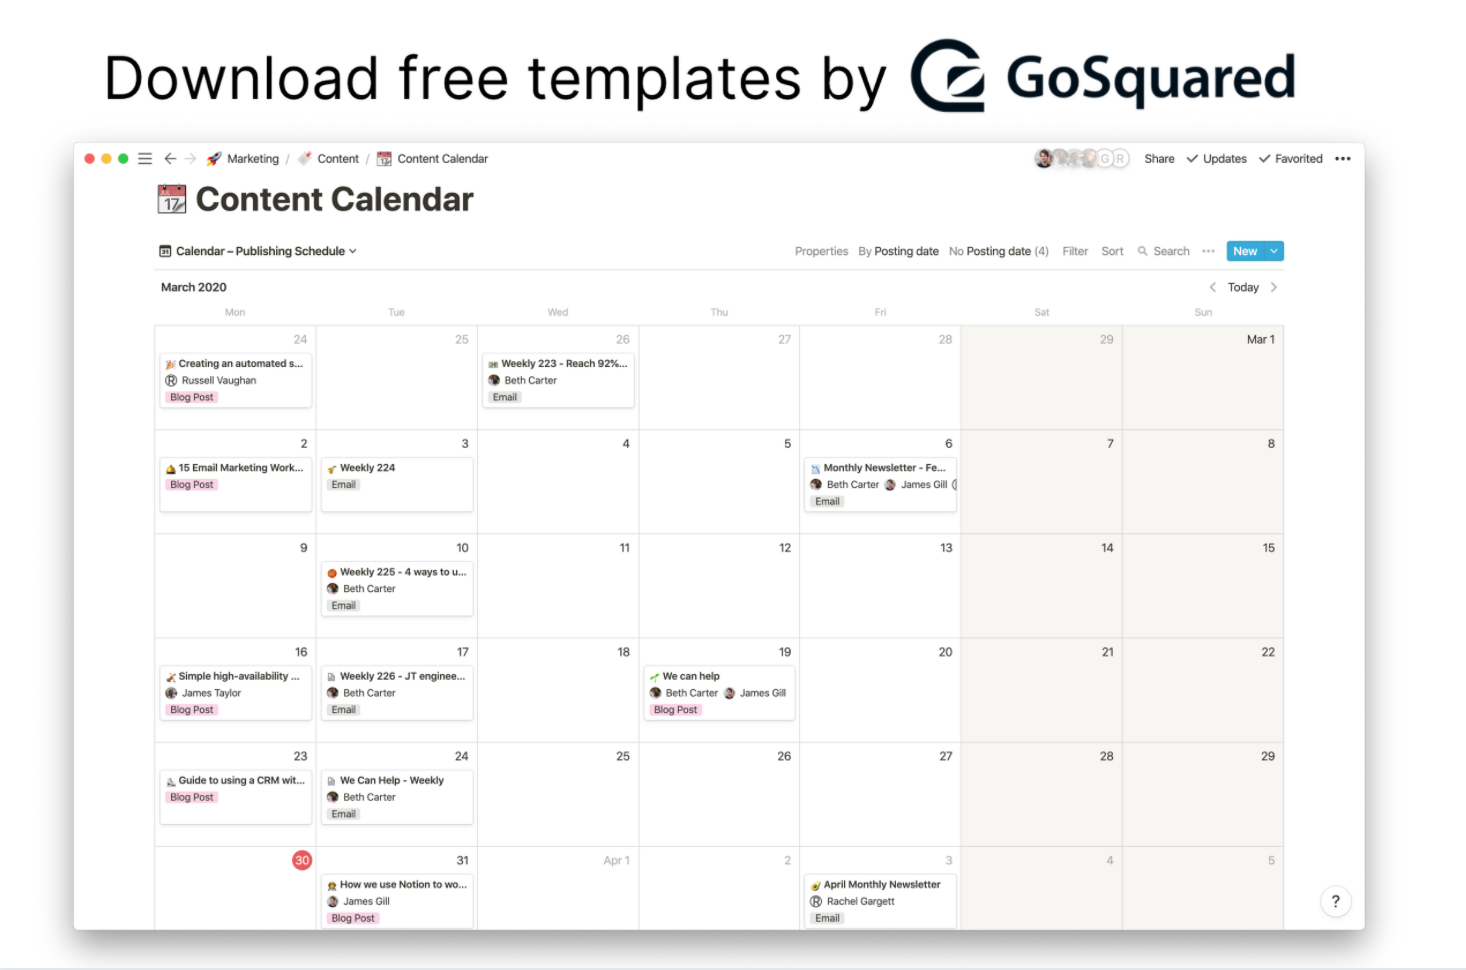
How Do You Create a Calendar View in Notion?
To create a calendar view of an existing Notion table:
1. Launch Notion and go to the table you wish to create the calendar view.
2. Ensure your table has at least one date column.
3. Click on the “Add a view” button on the top-left of your table’s title.
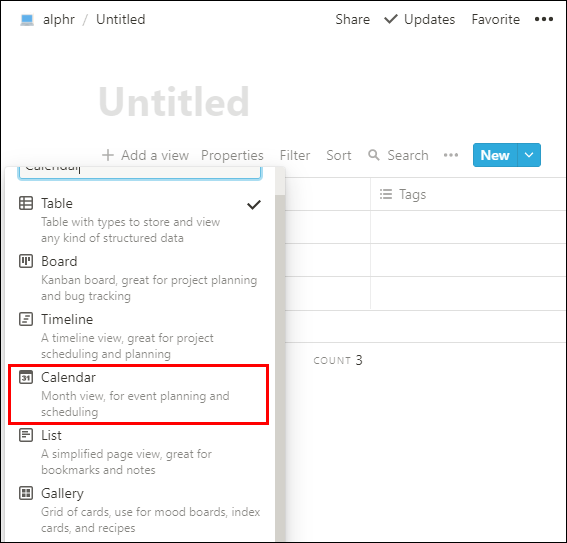
4. From the view menu, enter the name of your view.
5. Select the “Calendar” view option.
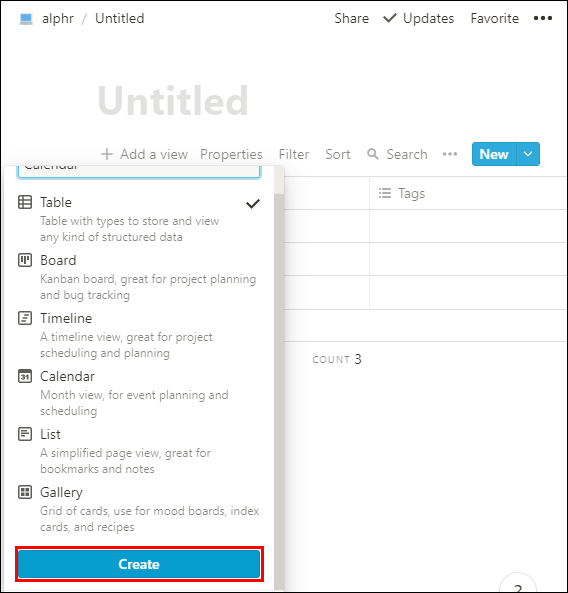
6. Then click on the “Create” button.
· Your calendar view will display your tasks by date.
How Do You Make a Custom Calendar in Notion?
You can customize your Notion calendar in the following ways:
By Editing Properties
To define your calendar, you can use as many properties as you wish to display the information you require and provide context:
1. Add a new card to your calendar and click on “+ Add a property” from the page that opens. Or, from the top of your calendar, click on “Properties” > “+ Add a property.”
2. Name the property and choose its type via the “Property Type” menu.
3. To remove or copy a property, to the left of it in the “Properties” menu, click on the **⋮⋮** icon for the property options.
By Moving and Stretching Cards
You can rearrange the cards on your calendar by dragging and dropping:
· Select and long-press any card to drag and drop to any day on your calendar.
· To span a card over several days:
1. Hover over its right or left edge.
2. Then click and drag it in either direction to expand it.
By Displaying, Hiding, and Ordering Properties
You can decide which properties you wish to display on your calendar cards. E.g., type of assignment or priority status etc.:
· Select “Properties,” then click on the switches beside the properties in your database to hide or display them.
· Use the **⋮⋮** icon to rearrange the order the properties display on your calendar cards by dragging them up or down the “Properties” menu.
How Do You Add an Event to a Calendar in Notion?
You can add a new card for an event to your calendar in the following ways:
• To create a new event on a particular day, hover your mouse over the day, then click on the “+” that appears.
• To create a new card on the day you’ve specified via the date property your calendar uses, click on the “New” button from the top-right.
• You can span an event over more than one day by hovering over the right or left edge of the card, then drag to expand in the required direction.
How Do You Edit a Calendar Entry in Notion?
To edit a calendar entry:
1. Select the entry you wish to edit from the calendar view.
2. The Notion page for the entry will display.
3. Make your changes; they will be saved automatically.
How Do You Edit a Calendar View in Notion?
To create a different view of your calendar:
1. Launch Notion and access your Calendar.
2. Click on the “Add a View” option from the top left of the calendar.
3. Select the view you want from the drop-down list of options.
4. Give your new view a name, then hit “Create.”
To create views showing the different filters applied to your calendar:
1. From the “Content Calendar” page.
2. Click on the downward pointing arrow next to your newly created calendar view.
3. Select “Add a View” > “Calendar,” then enter its name and “Create.”
4. Select the “Filter” option from the “Properties” options towards the right.
5. Click on “Add Filter.”
6. Click on the “Name” downward pointing arrow to select the filter name.
7. Then click on the “Select an Option” downward pointing arrow to select the filter option.
To switch between your different calendar views, click on the downward pointing arrow just above your calendars on the left for the “View menu.”
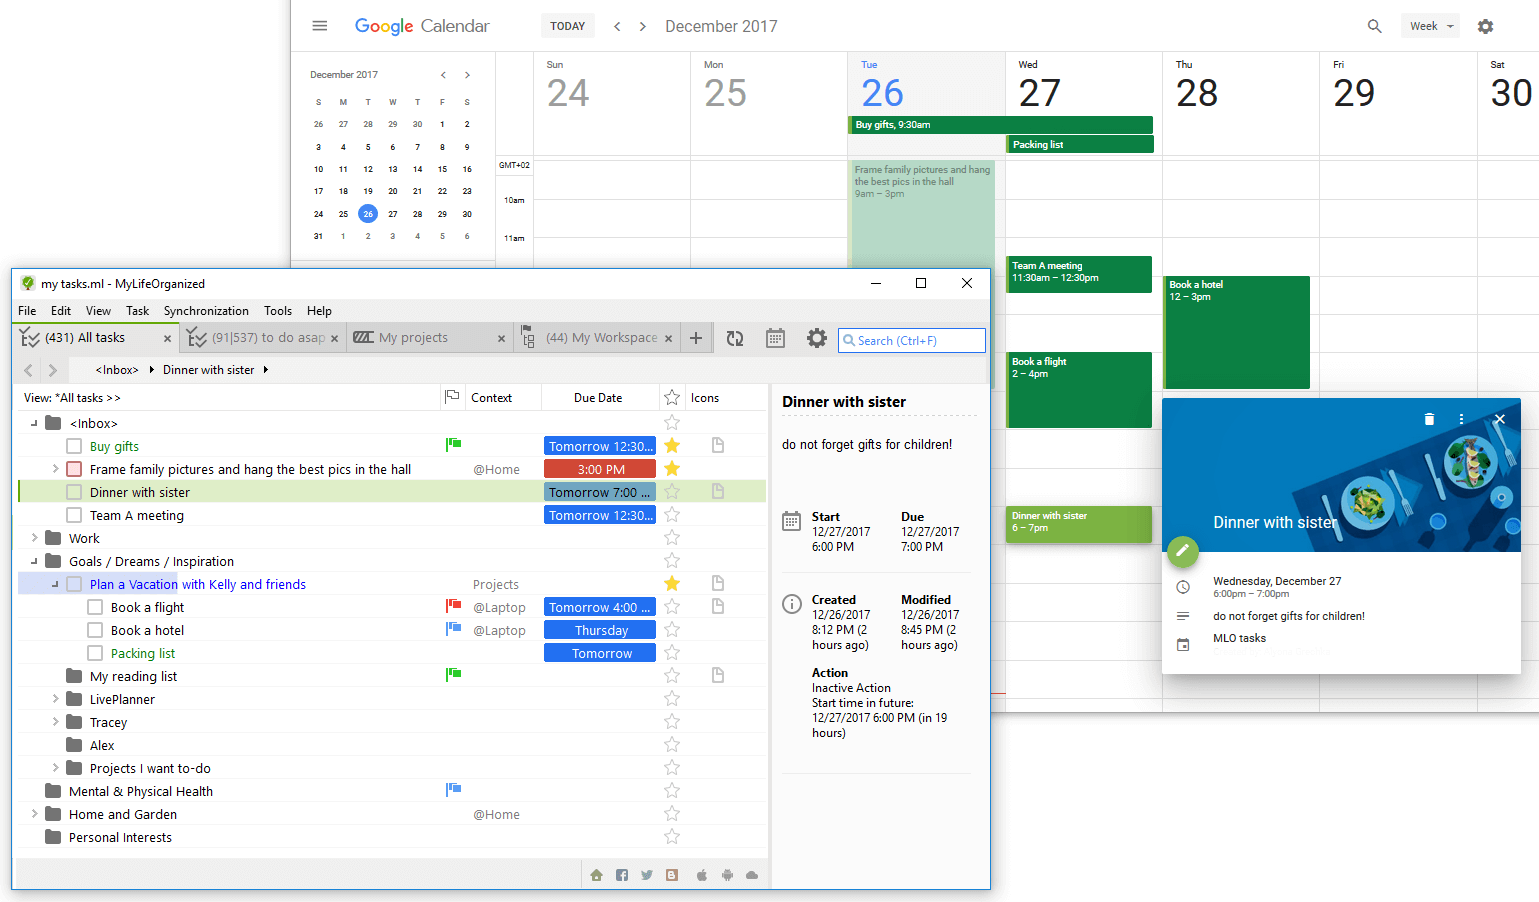
Стоит ли все-таки синхронизировать Календарь Google с Notion?
Что ж, ответ на этот вопрос зависит от того, чего вы пытаетесь достичь, интегрируя две службы. Если вы хотите создать рабочее пространство в Notion, где вы можете хранить все обновления и информацию, относящиеся к вашему проекту, в одном месте, чтобы вы и члены вашей команды всегда были в курсе событий вашего проекта, интегрируя Календарь Google с Notion имеет абсолютный смысл.
Однако, если вы интегрируете эти две службы, думая, что можете планировать свои проекты или личный рабочий процесс и автоматически добавлять задачи в свой календарь в Notion, вы не сможете получить от интеграции особую пользу. Вместо этого в этом случае лучшим выбором было бы использовать какое-либо другое решение для управления проектами, которое поддерживает реальную интеграцию с функциями чтения и записи.
Программы для Windows, мобильные приложения, игры — ВСЁ БЕСПЛАТНО, в нашем закрытом телеграмм канале — Подписывайтесь:)
So… is there any alternative to Google Calendar?
If you want to create events in the calendar in Notion, then there an alternative option available to Google Calendar. You can manage multi-date calendar events in Notion. In fact, there’s a calendar available in Notion where you will able to set the events so you will never miss any important meeting or your friend’s birthdate. Furthermore, you can sort the calendar accordingly which is quite good.
Once you have clicked on a chosen date, a page will appear where you are able to fill in details about the event. Besides this, you can add an emoji to make look it more enhanced with the option of adding a description for future reference.
For more depth information, we’ve attached a YouTube video by Marie Poulin where she clearly guides on how to manage multi-date calendar events in Notion.
That’s it for now, hope this helps! If you have any queries you are free to ask them in the comment section below. Till then stay tuned for more information.
Read next: Does Notion Compress Images?
About This Notion Guide
Here are just a few reasons why syncing with Unito makes more sense than a native embed:
- Your calendar can be edited: Notion’s native integration is 1-way, so you’re stuck with a read-only view. Unito lets you sync changes in Notion to Google Calendar so any updates you make on either end are immediately reflected in the other.
- You can choose a private or public calendar: We know privacy and security matter to you. That’s why, unlike with a native integration, your calendar events can stay private as they’re synced with other tools.
- A calendar sync is just the start: Unito offers over 30 integrations you can connect to Notion and Google Calendar. That means Notion can become your hub, or all-in-one solution, regardless of the other tools your team uses.
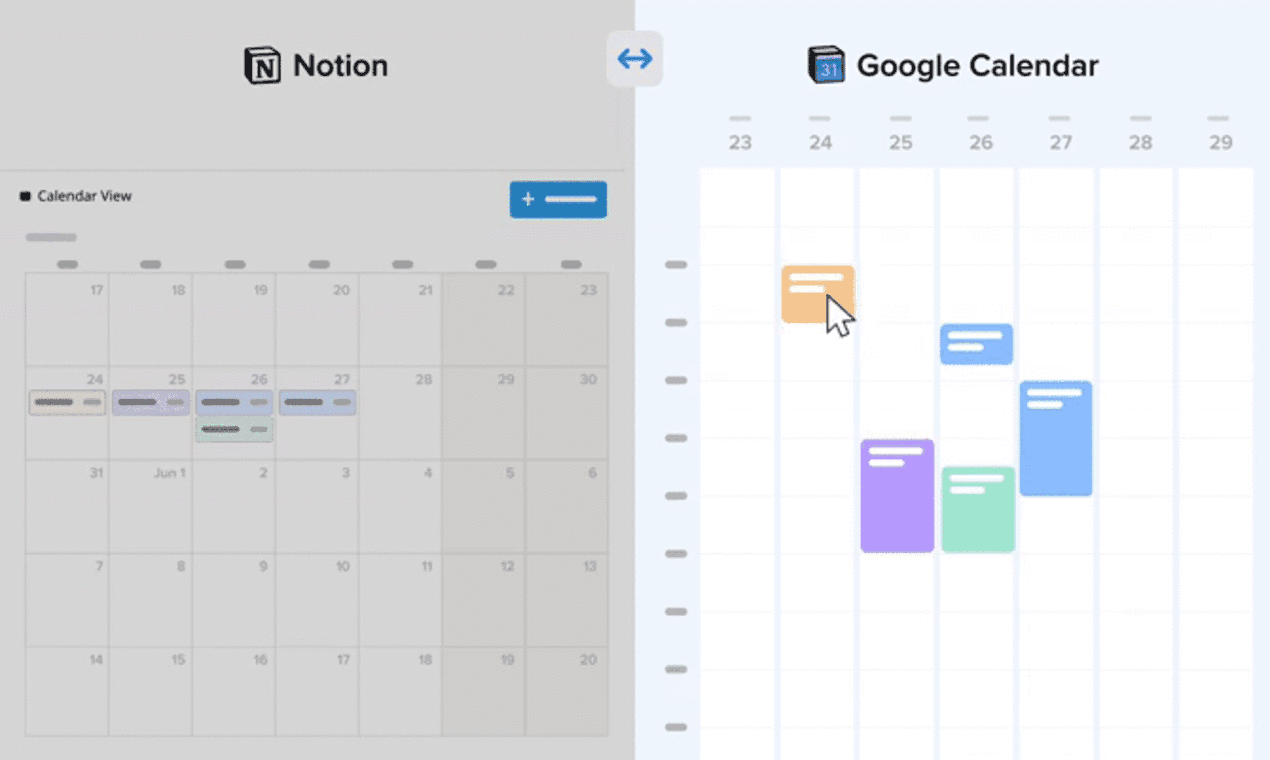
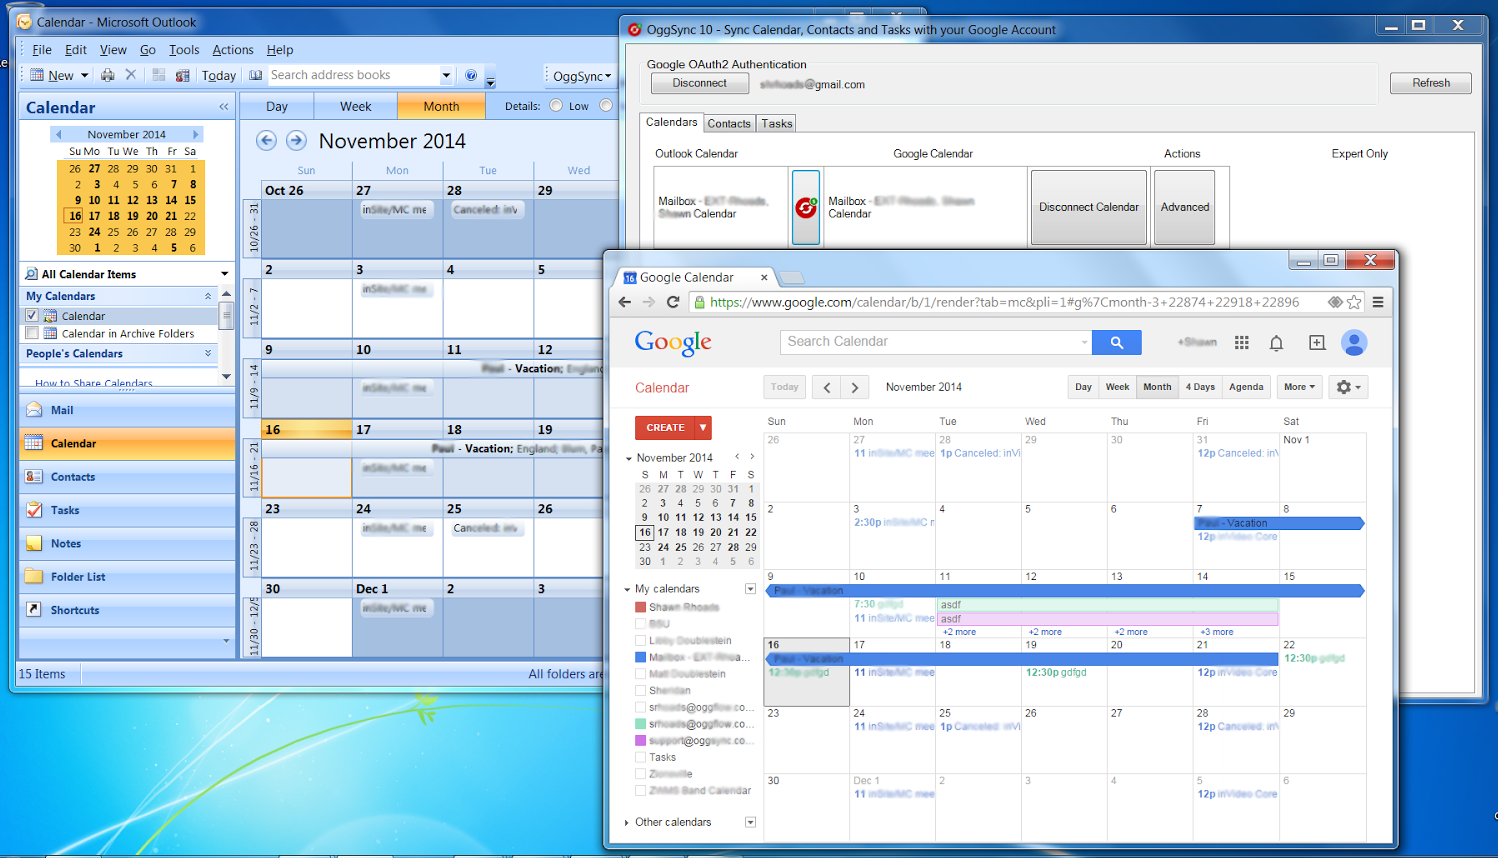
Google Calendar to Notion [Scenario 1]
This first scenario will enable you to get your Google Calendar events into Notion.
- Go to Make
- Create an account if you don’t have one already
- Go to your scenarios & hit the + Create a new scenario button
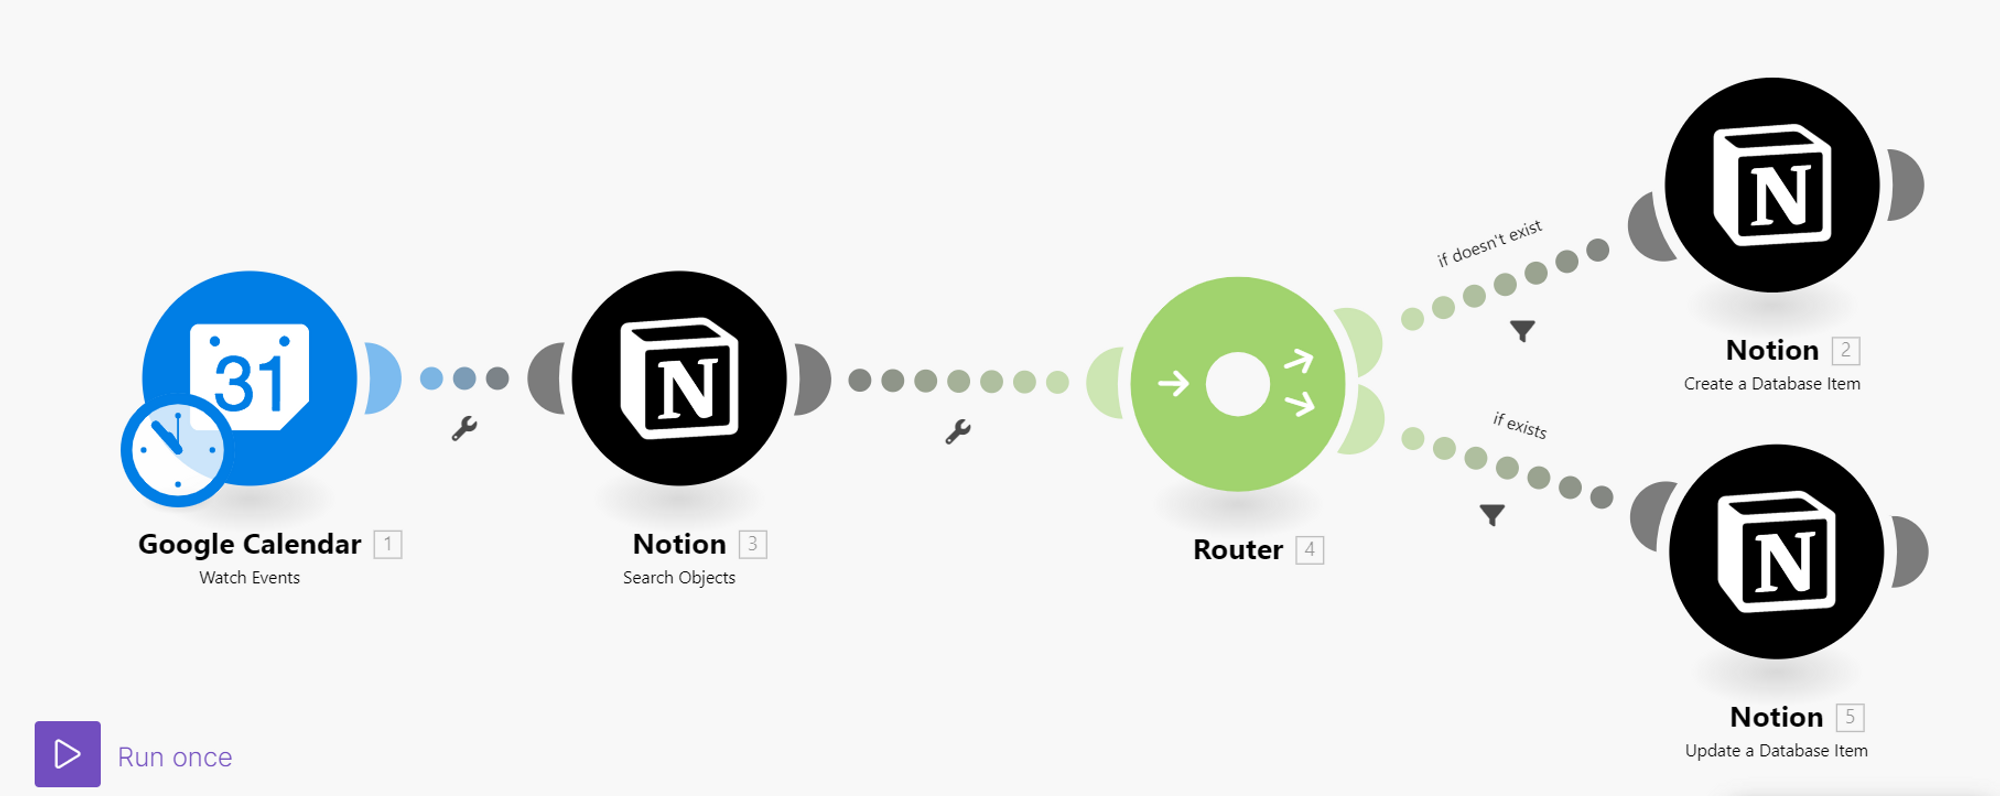
1st Module: Google Calendar
- Hit the big “+” button to build your first module
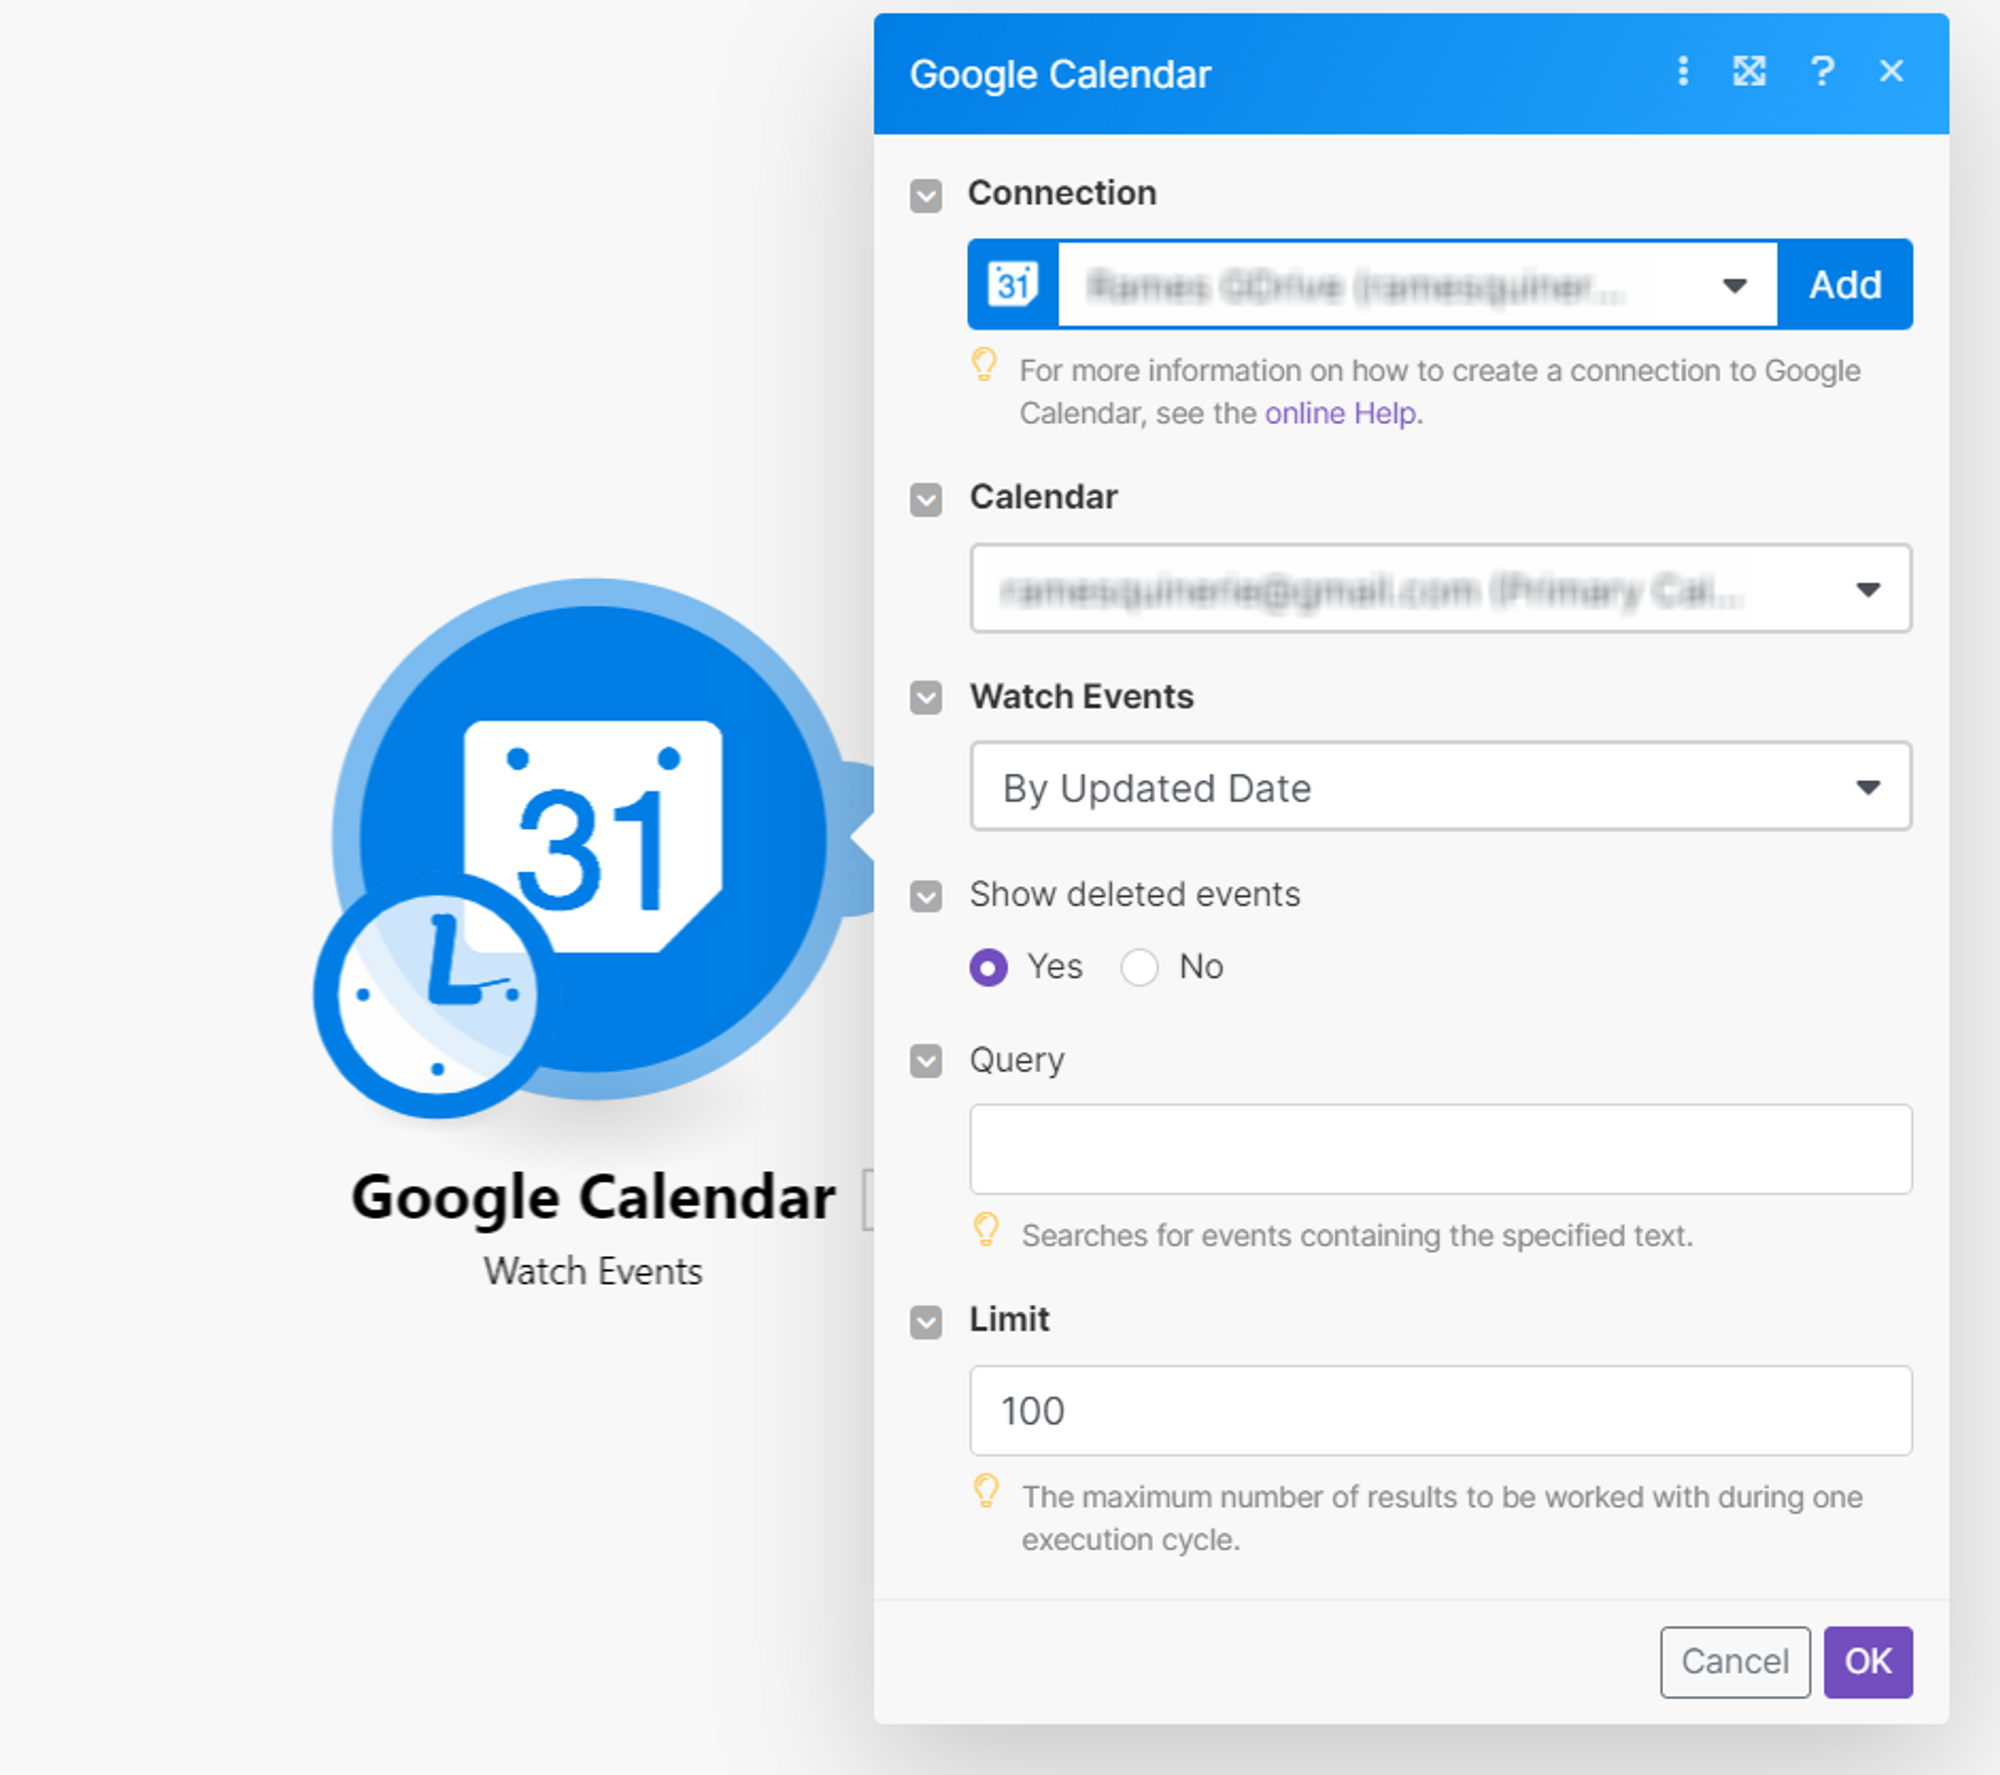
- Search Google Calendar in the applications & choose Watch Events️ Add a new connection if you never connected your Google Calendar to Make & follow the steps
- Fill out the information:️ Calendar = your desired calendar️ Watch Events = By Updated Date️ Show deleted events = Yes️ Query: keep it blank️ Limit = 10
- OK
2nd Module: Notion
- Add another module (to the right of your Google Calendar module)
- Search Notion in the applications & choose Search Objects️ Create a new connection if you never connected your Notion to Make & follow the steps️ Make sure to choose the parent page where your calendar exists (or your entire workspace if you’re not sure)
- Fill out the information:️ Search Objects = Database Items️ Database ID*️ Filter: Gcalendar ID (Notion) = Event ID (Google Calendar)️ Limit = 1
- OK
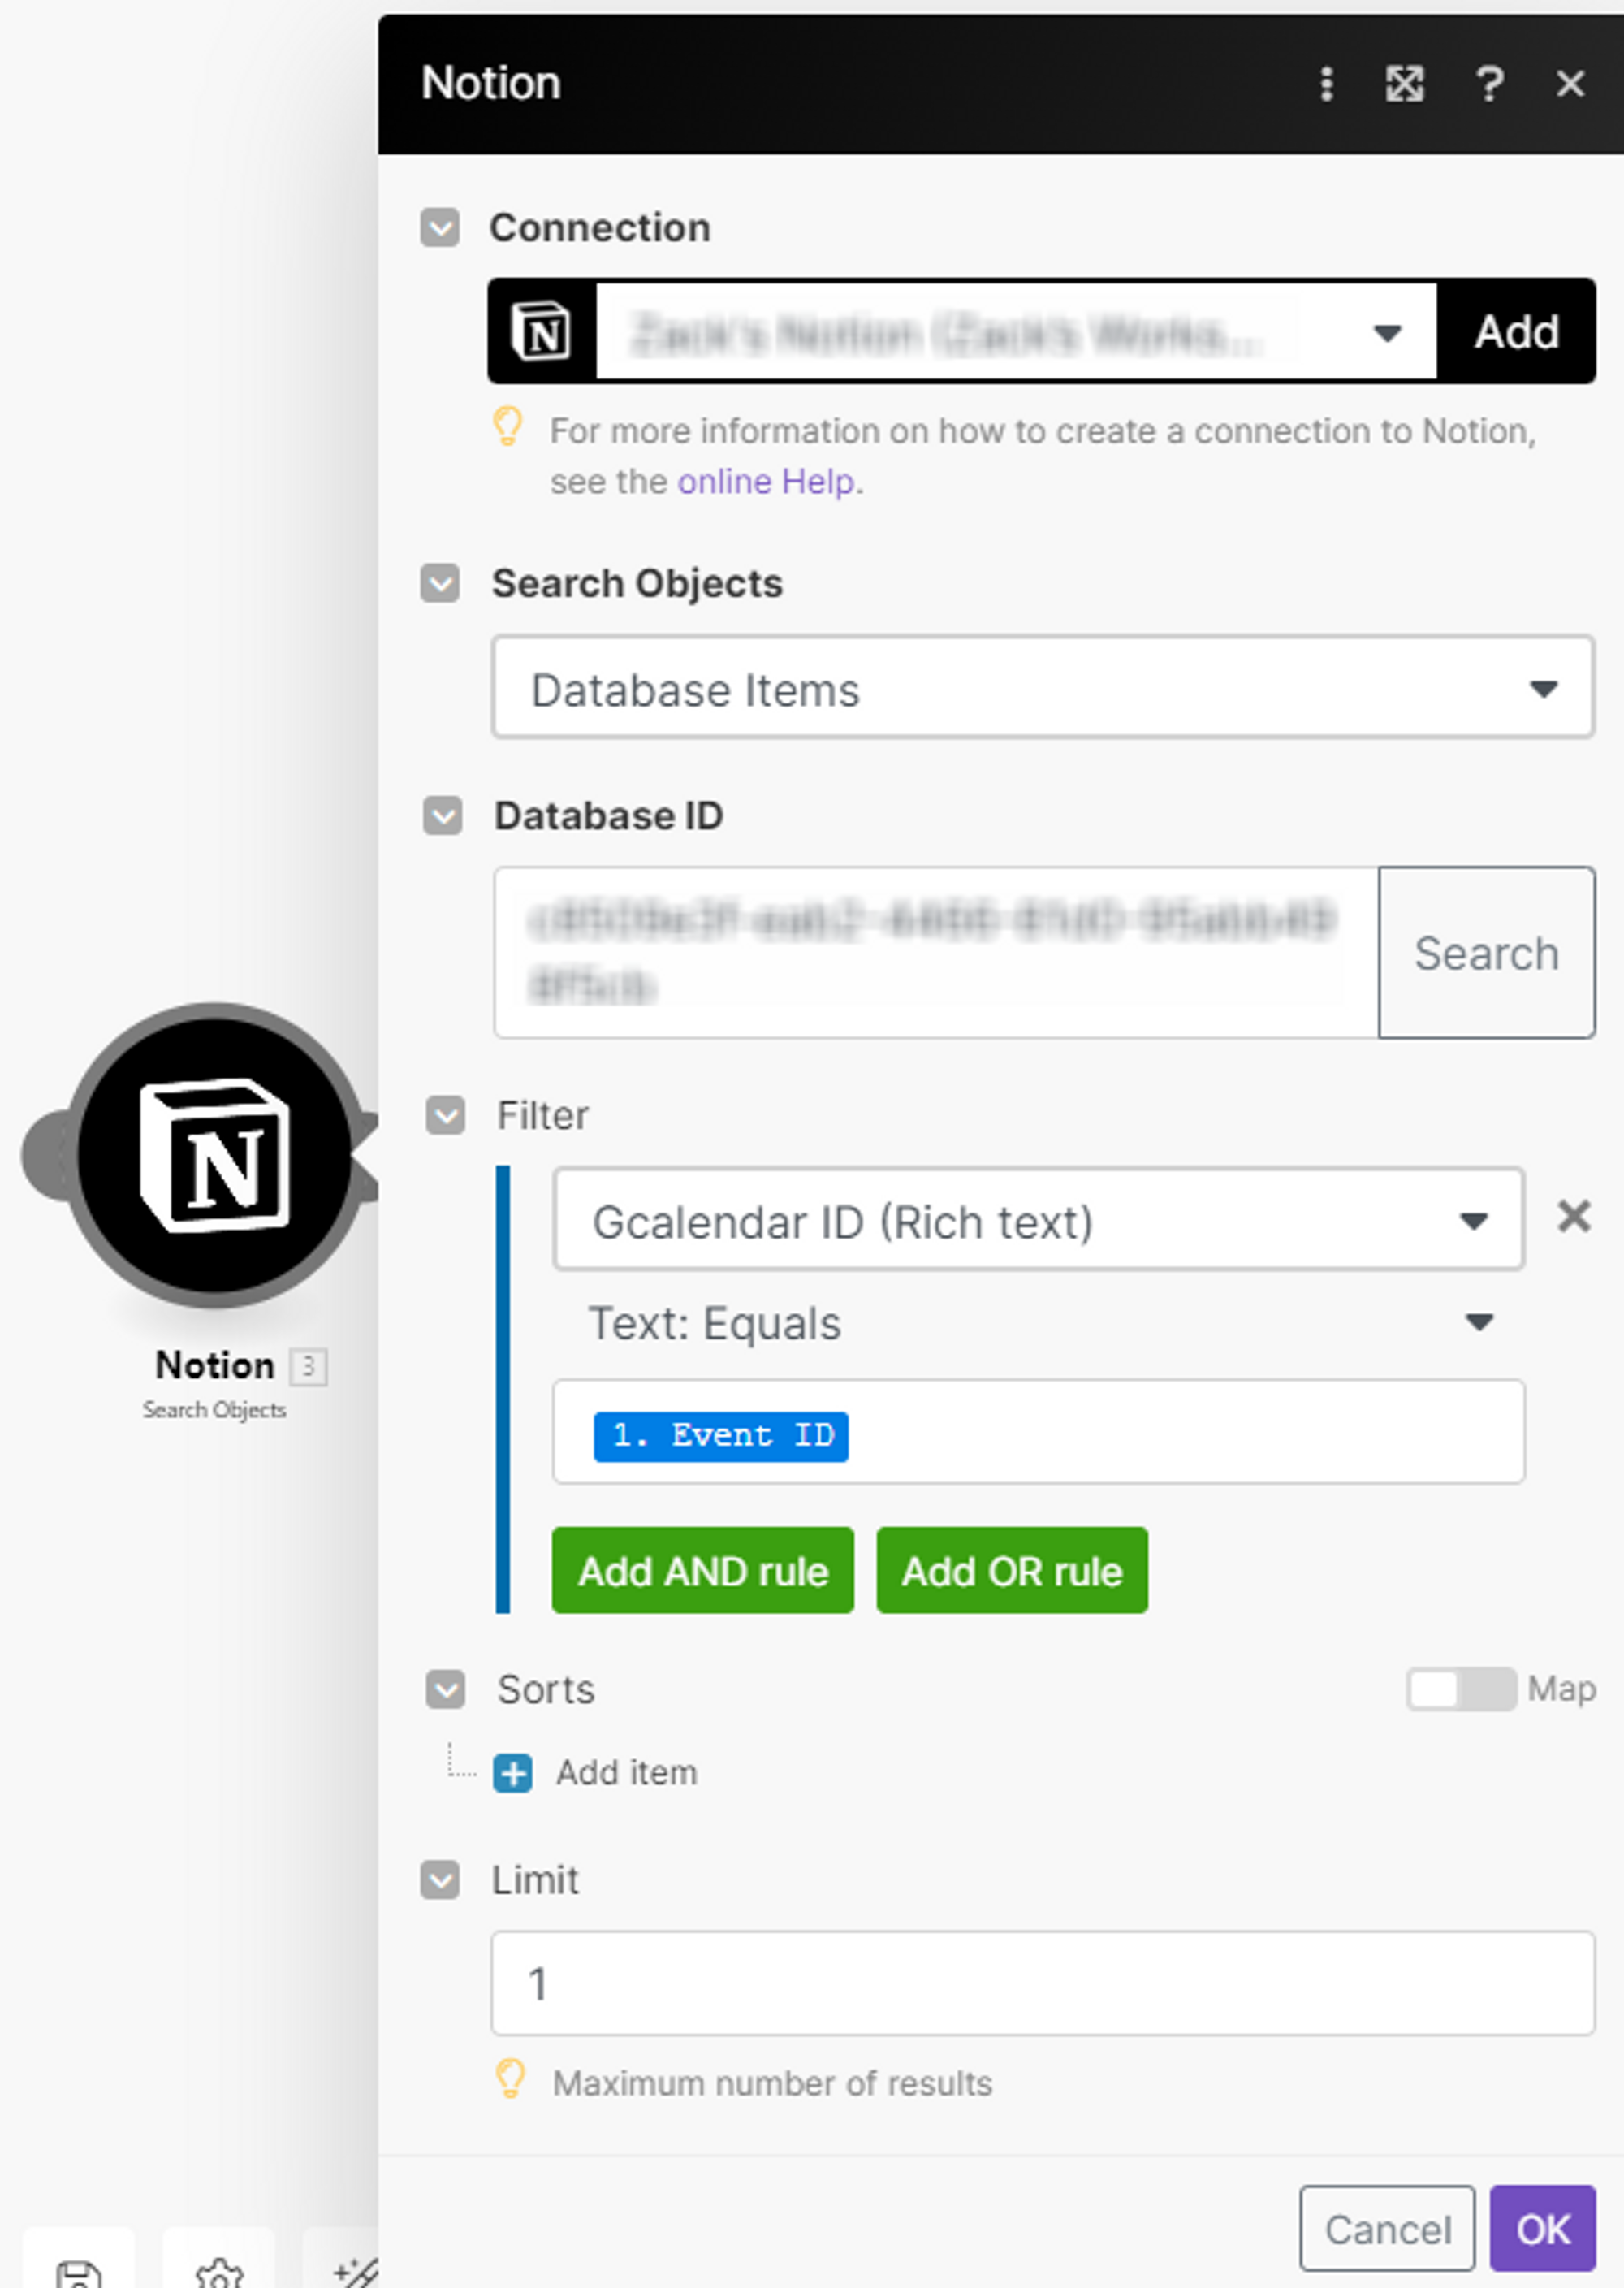
*To find your ID: Open the database as a full page in Notion. Use the Share menu to Copy link. Now paste the link in your text editor so you can take a closer look. The URL uses the following format: https://www.notion.so/{workspace_name}/{database_id}?v={view_id} OR Click Search & input the exact name of the database

Filter between Google Calendar & Notion
If you used your Google Calendar for a while, you may want to set up a filter between the first Google module and the second Notion module.
- Name the filter something like “New events”
- In the filter, add️ Start (from Google Calendar)️ Later than (datetime operator)️ Date: put today’s date or whatever suits you best
- OK
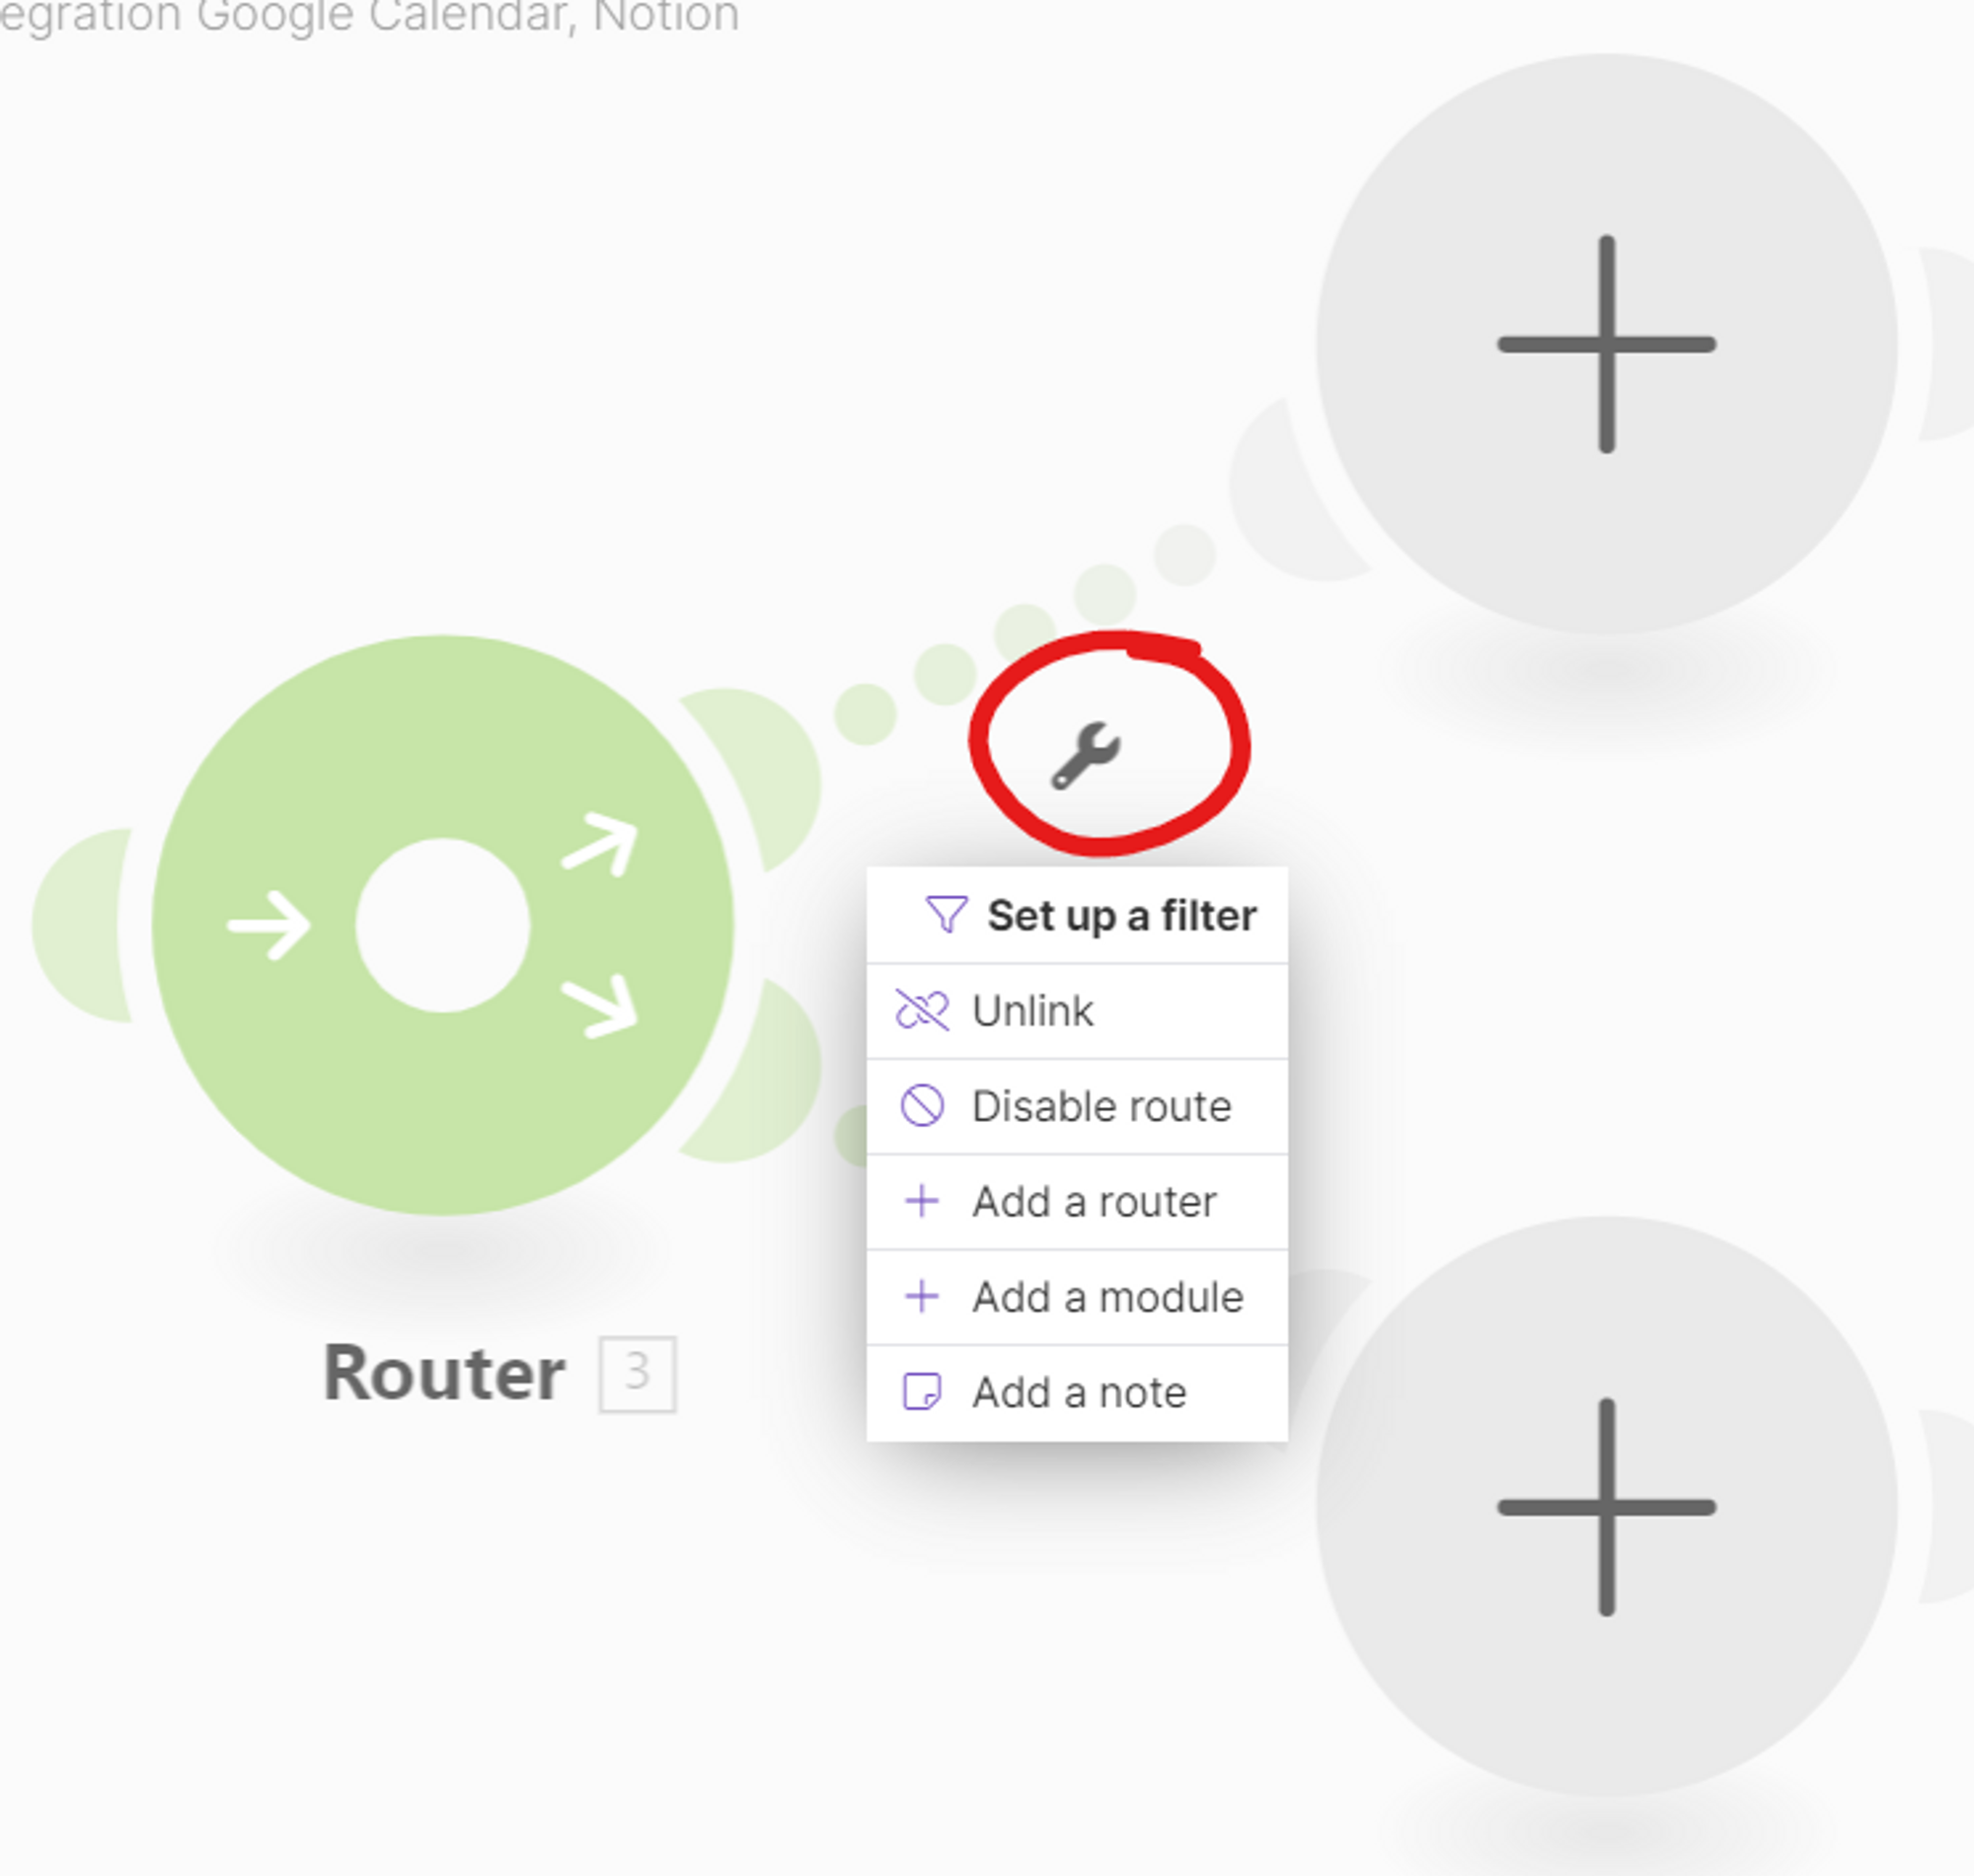
- Add another module
- Search for Flow Control & choose Router (it will automatically make 2 paths)
4th Module: Upper path
- Connect a new Notion module & choose Create a Database Item
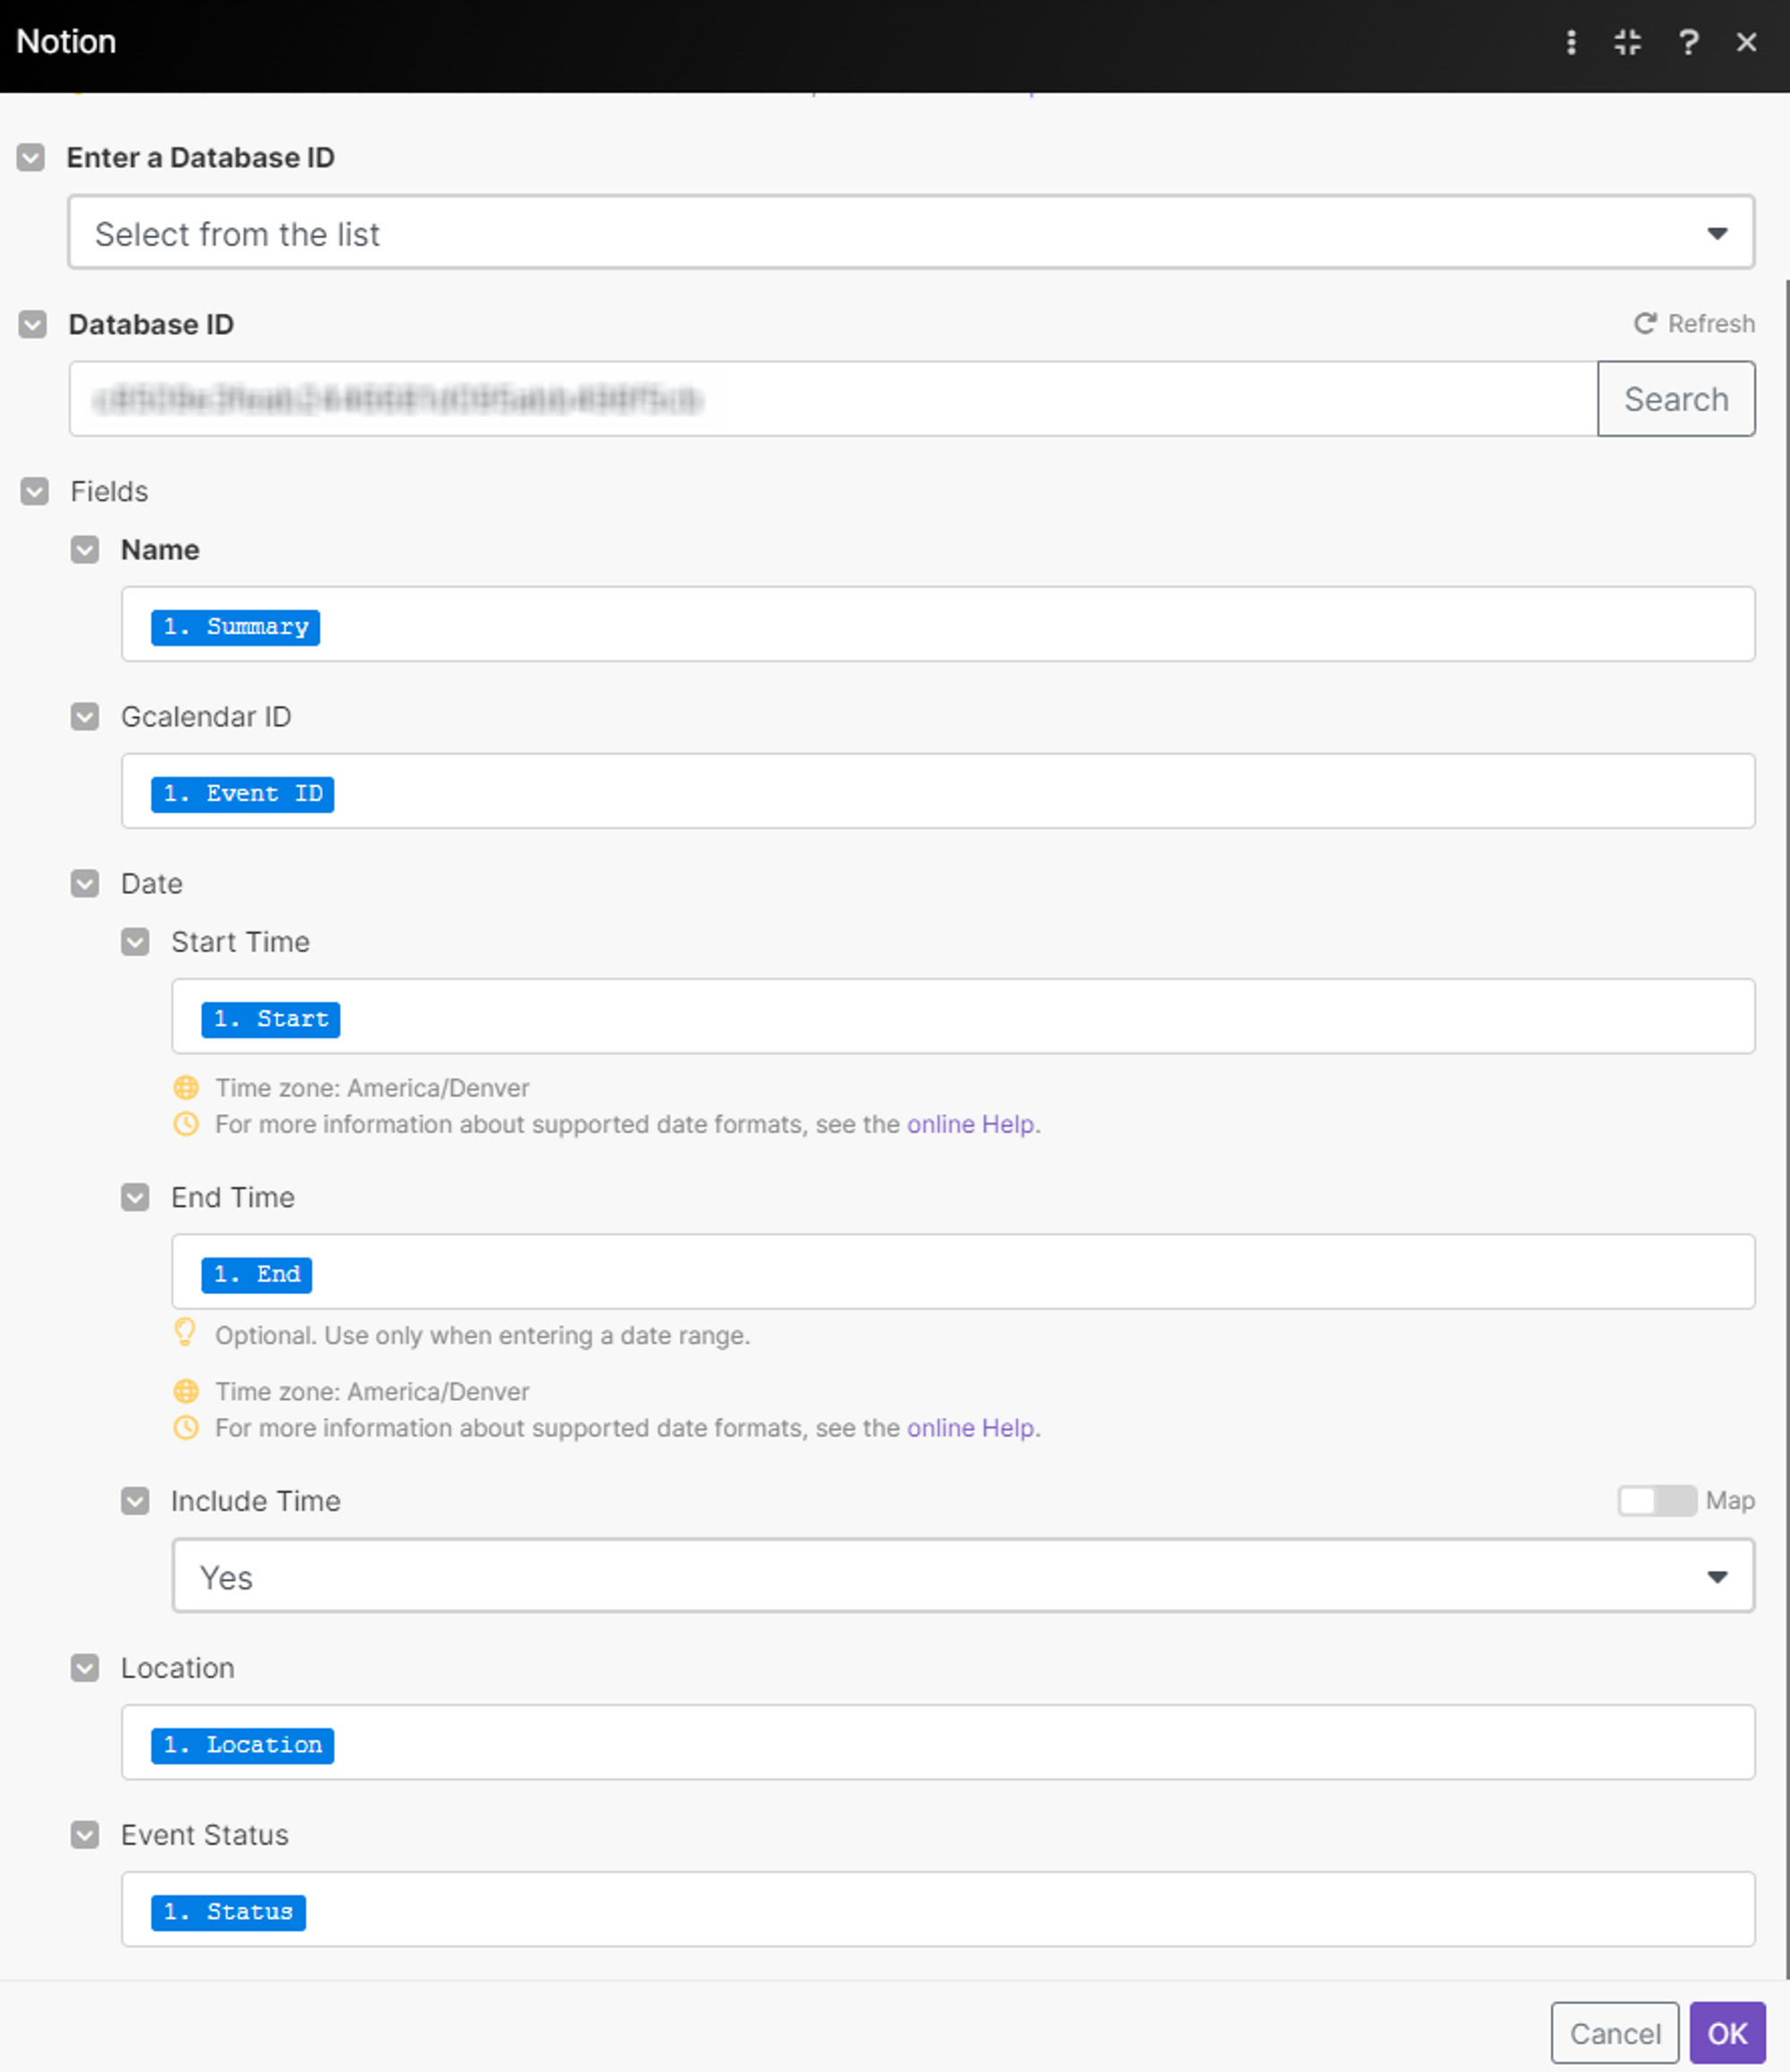
- Fill out information️ Database ID = the same as previously️ Name = Summary️ Gcalendar ID = Event ID️ Date️️Start Time = Start️️ End Time = End️ Include Time = Yes️ Location = Location️ Event Status = Status (️ very important as only events with “Event Status” = “confirmed” will be tracked in Notion)
- OK
Upper path filtering
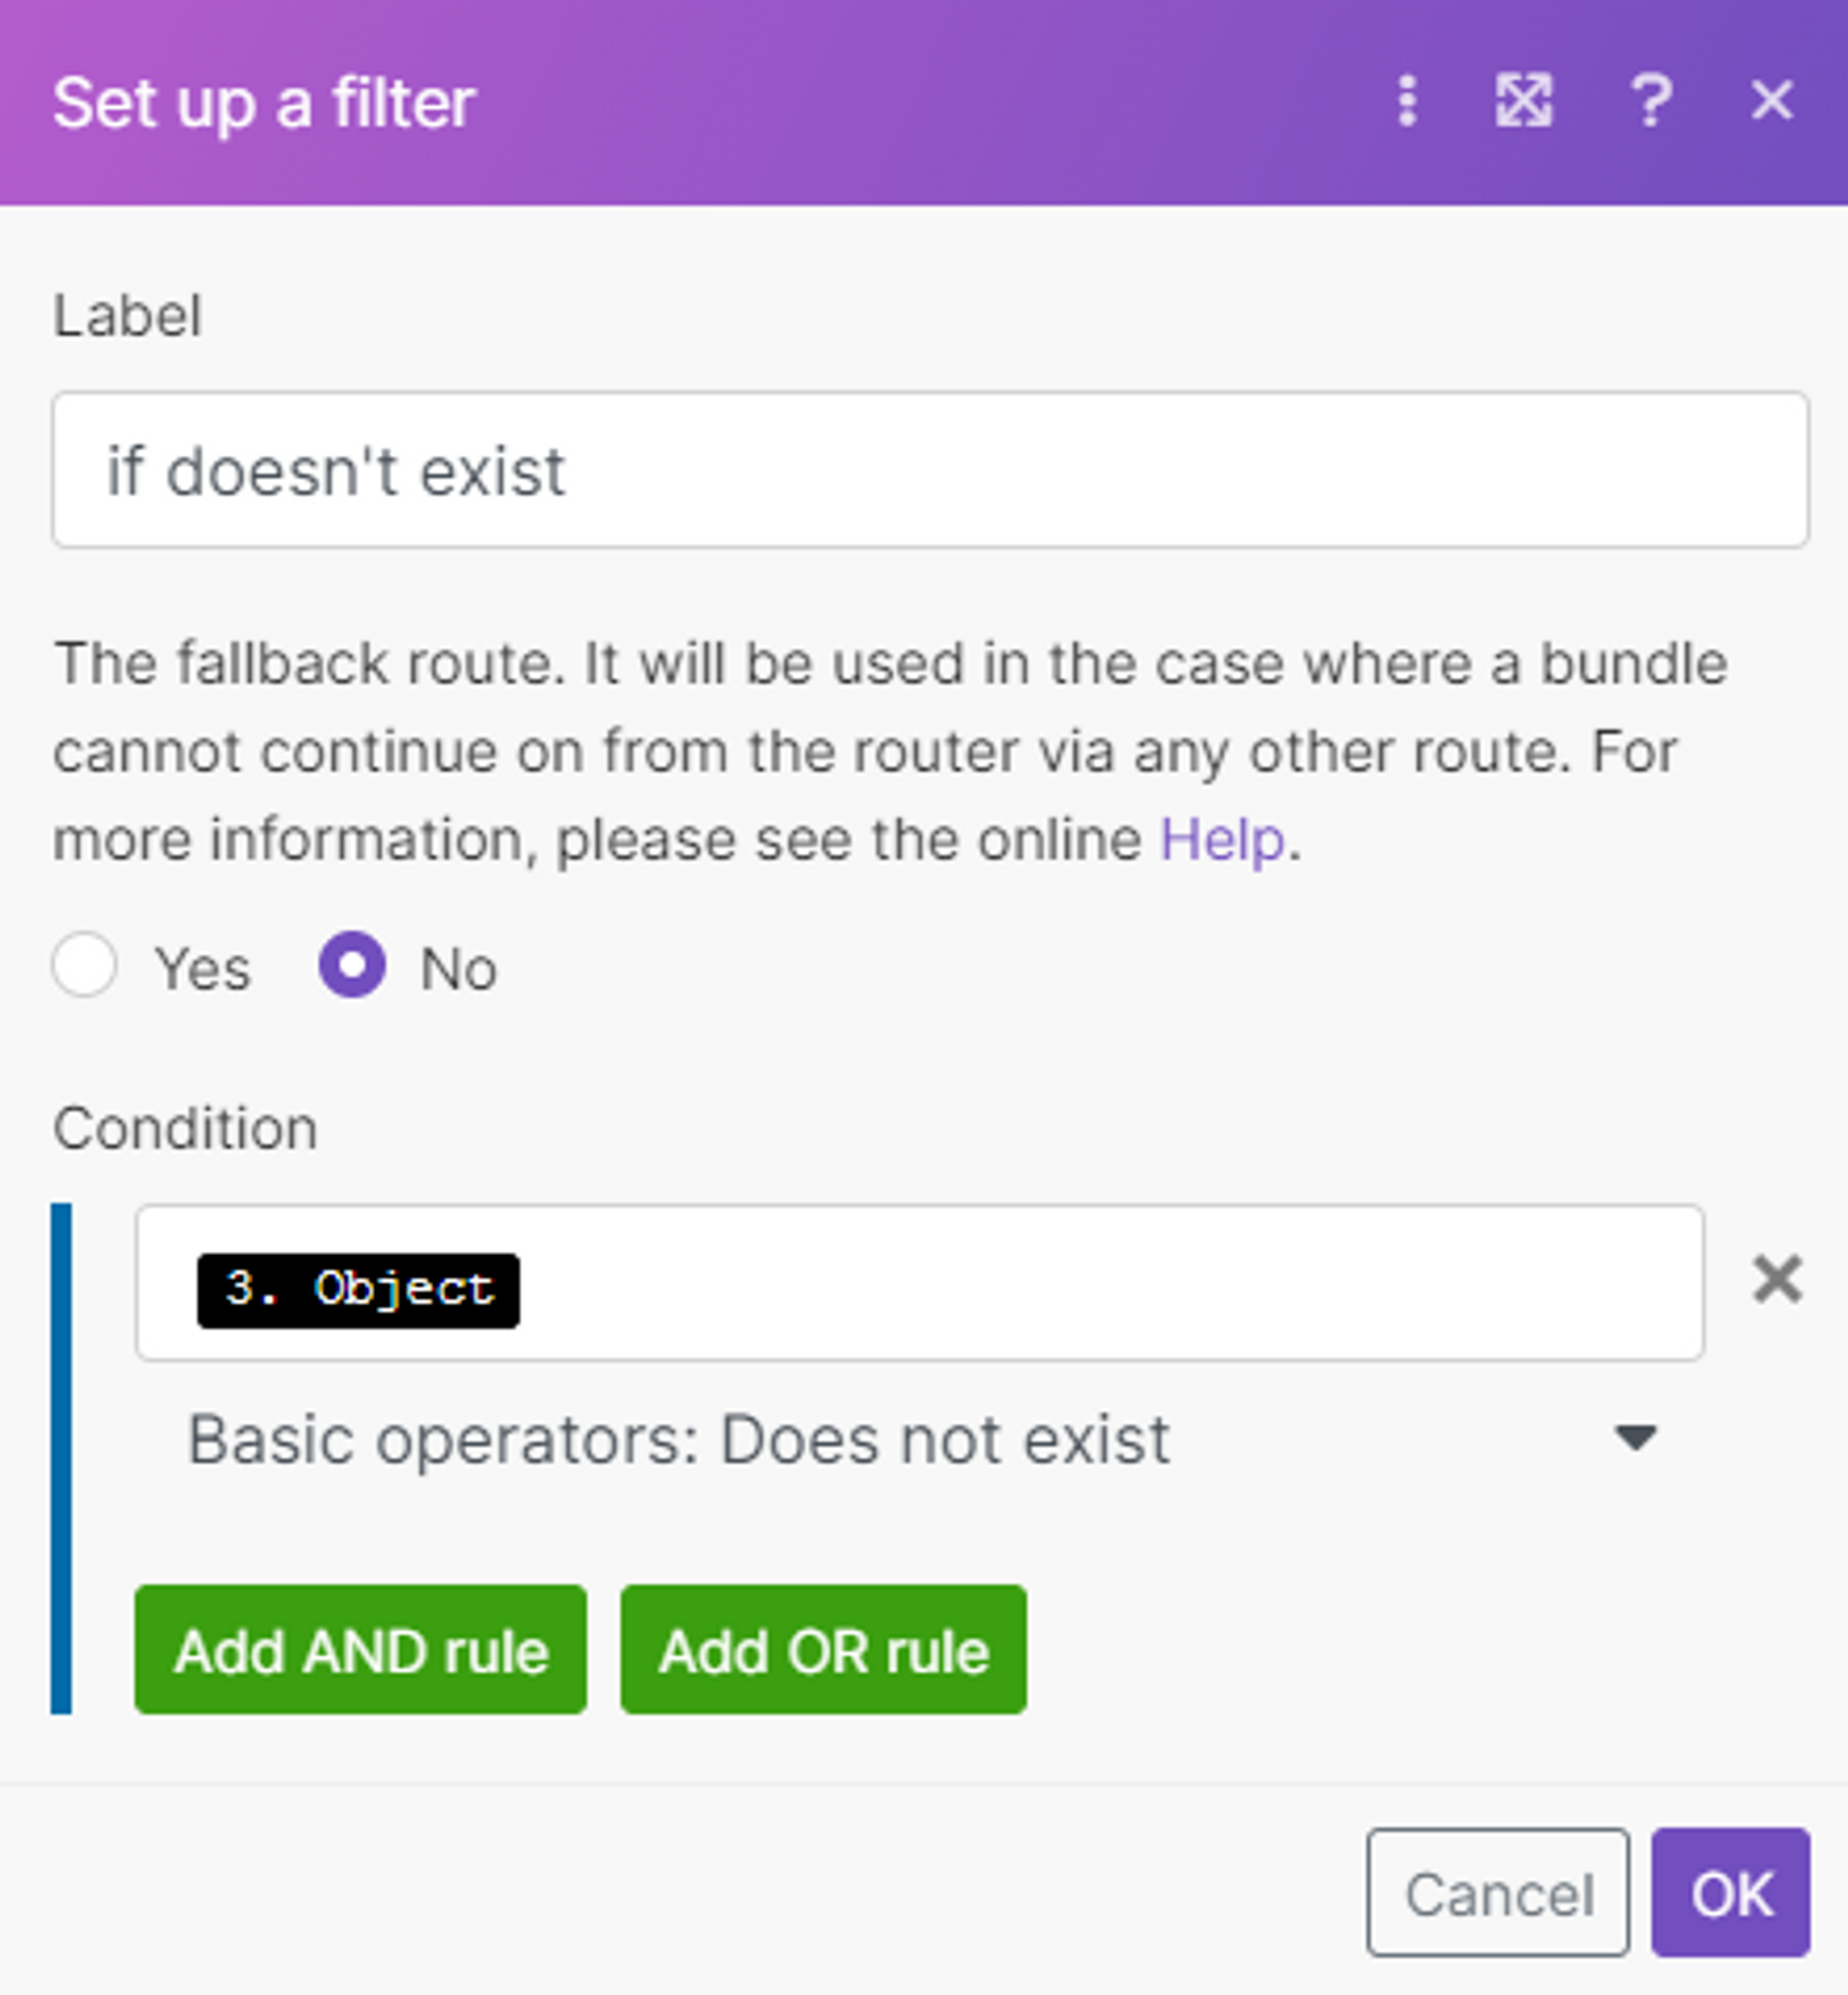
Filter between the Router & the Notion module:
- Choose the & select Set up a filter️ Label = “if doesn’t exist”️ Condition = 3. Object → “Basic Operators: Does not exist”
5th Module: Lower Path
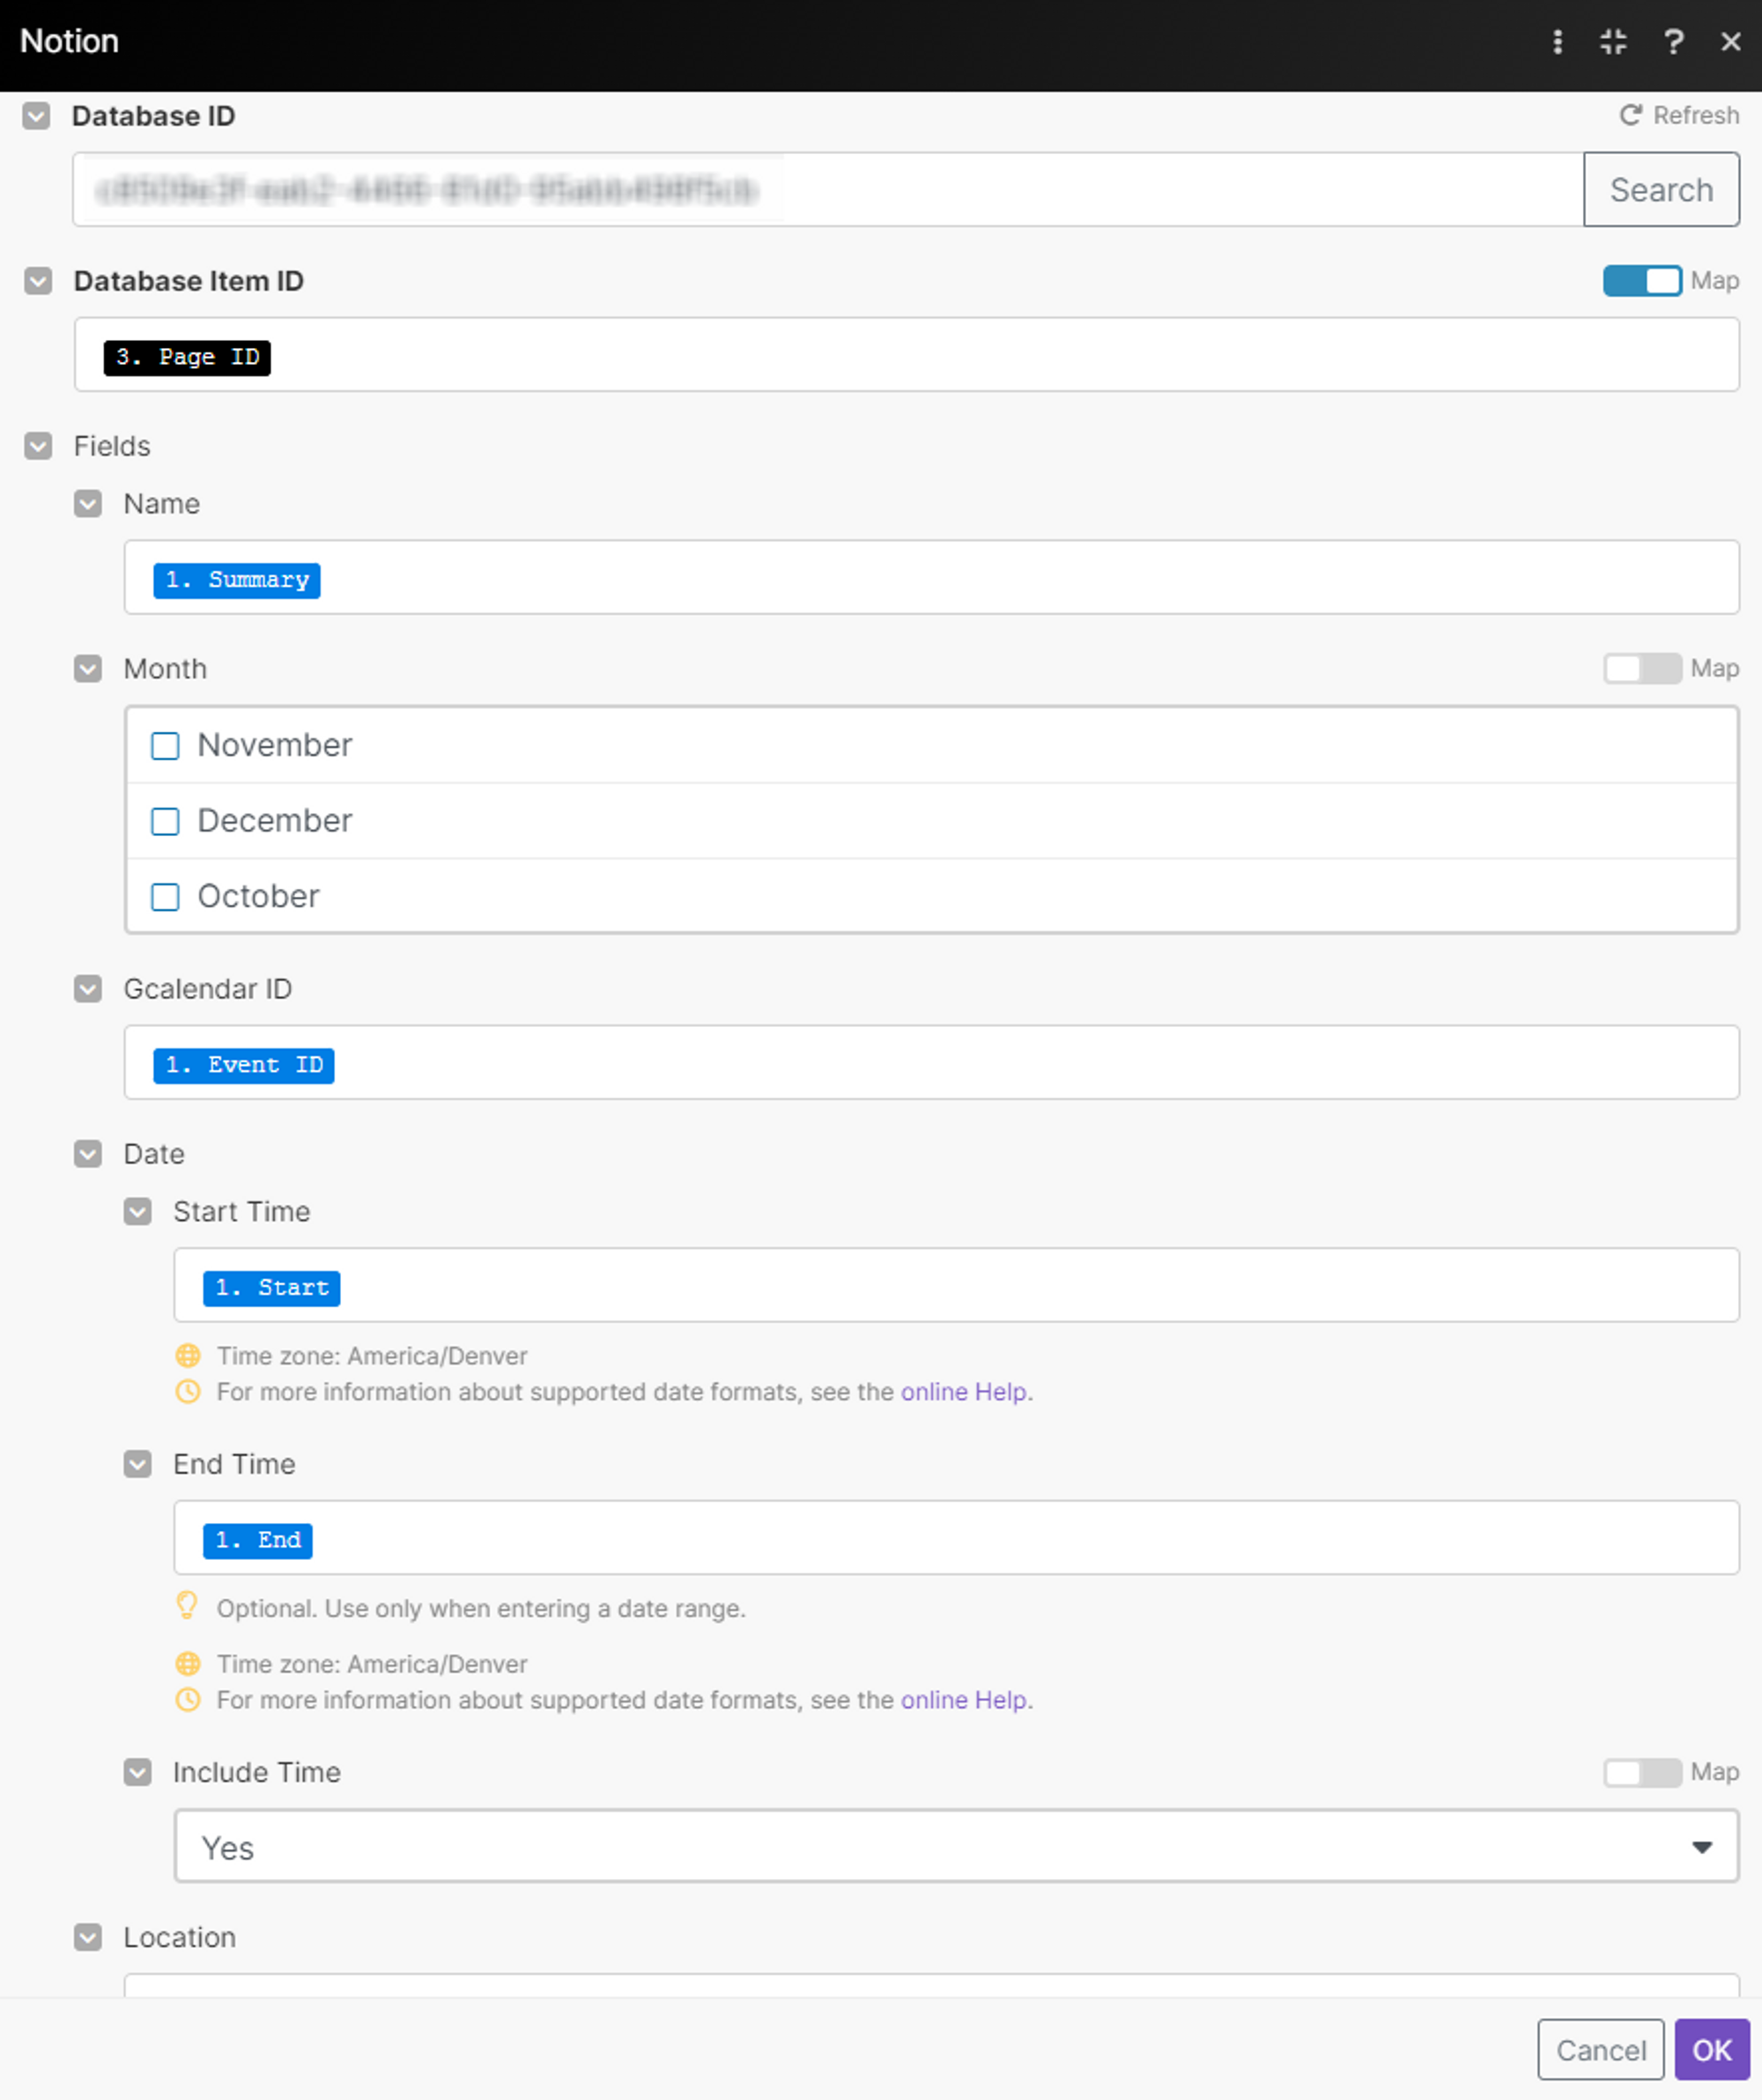
- Connect a new Notion module & choose Update a Database Item️ Database ID = the same as previously️ Database Item ID = Page ID (from Notion)️ Name = Summary️ Gcalendar ID = Event ID️ Date️️ Start Time = Start️️ End Time = End️ Include Time = Yes️ Location = Location️ Event Status = Status (️ very important as only events with “Event Status” = “confirmed” will be tracked in Notion)
- OK
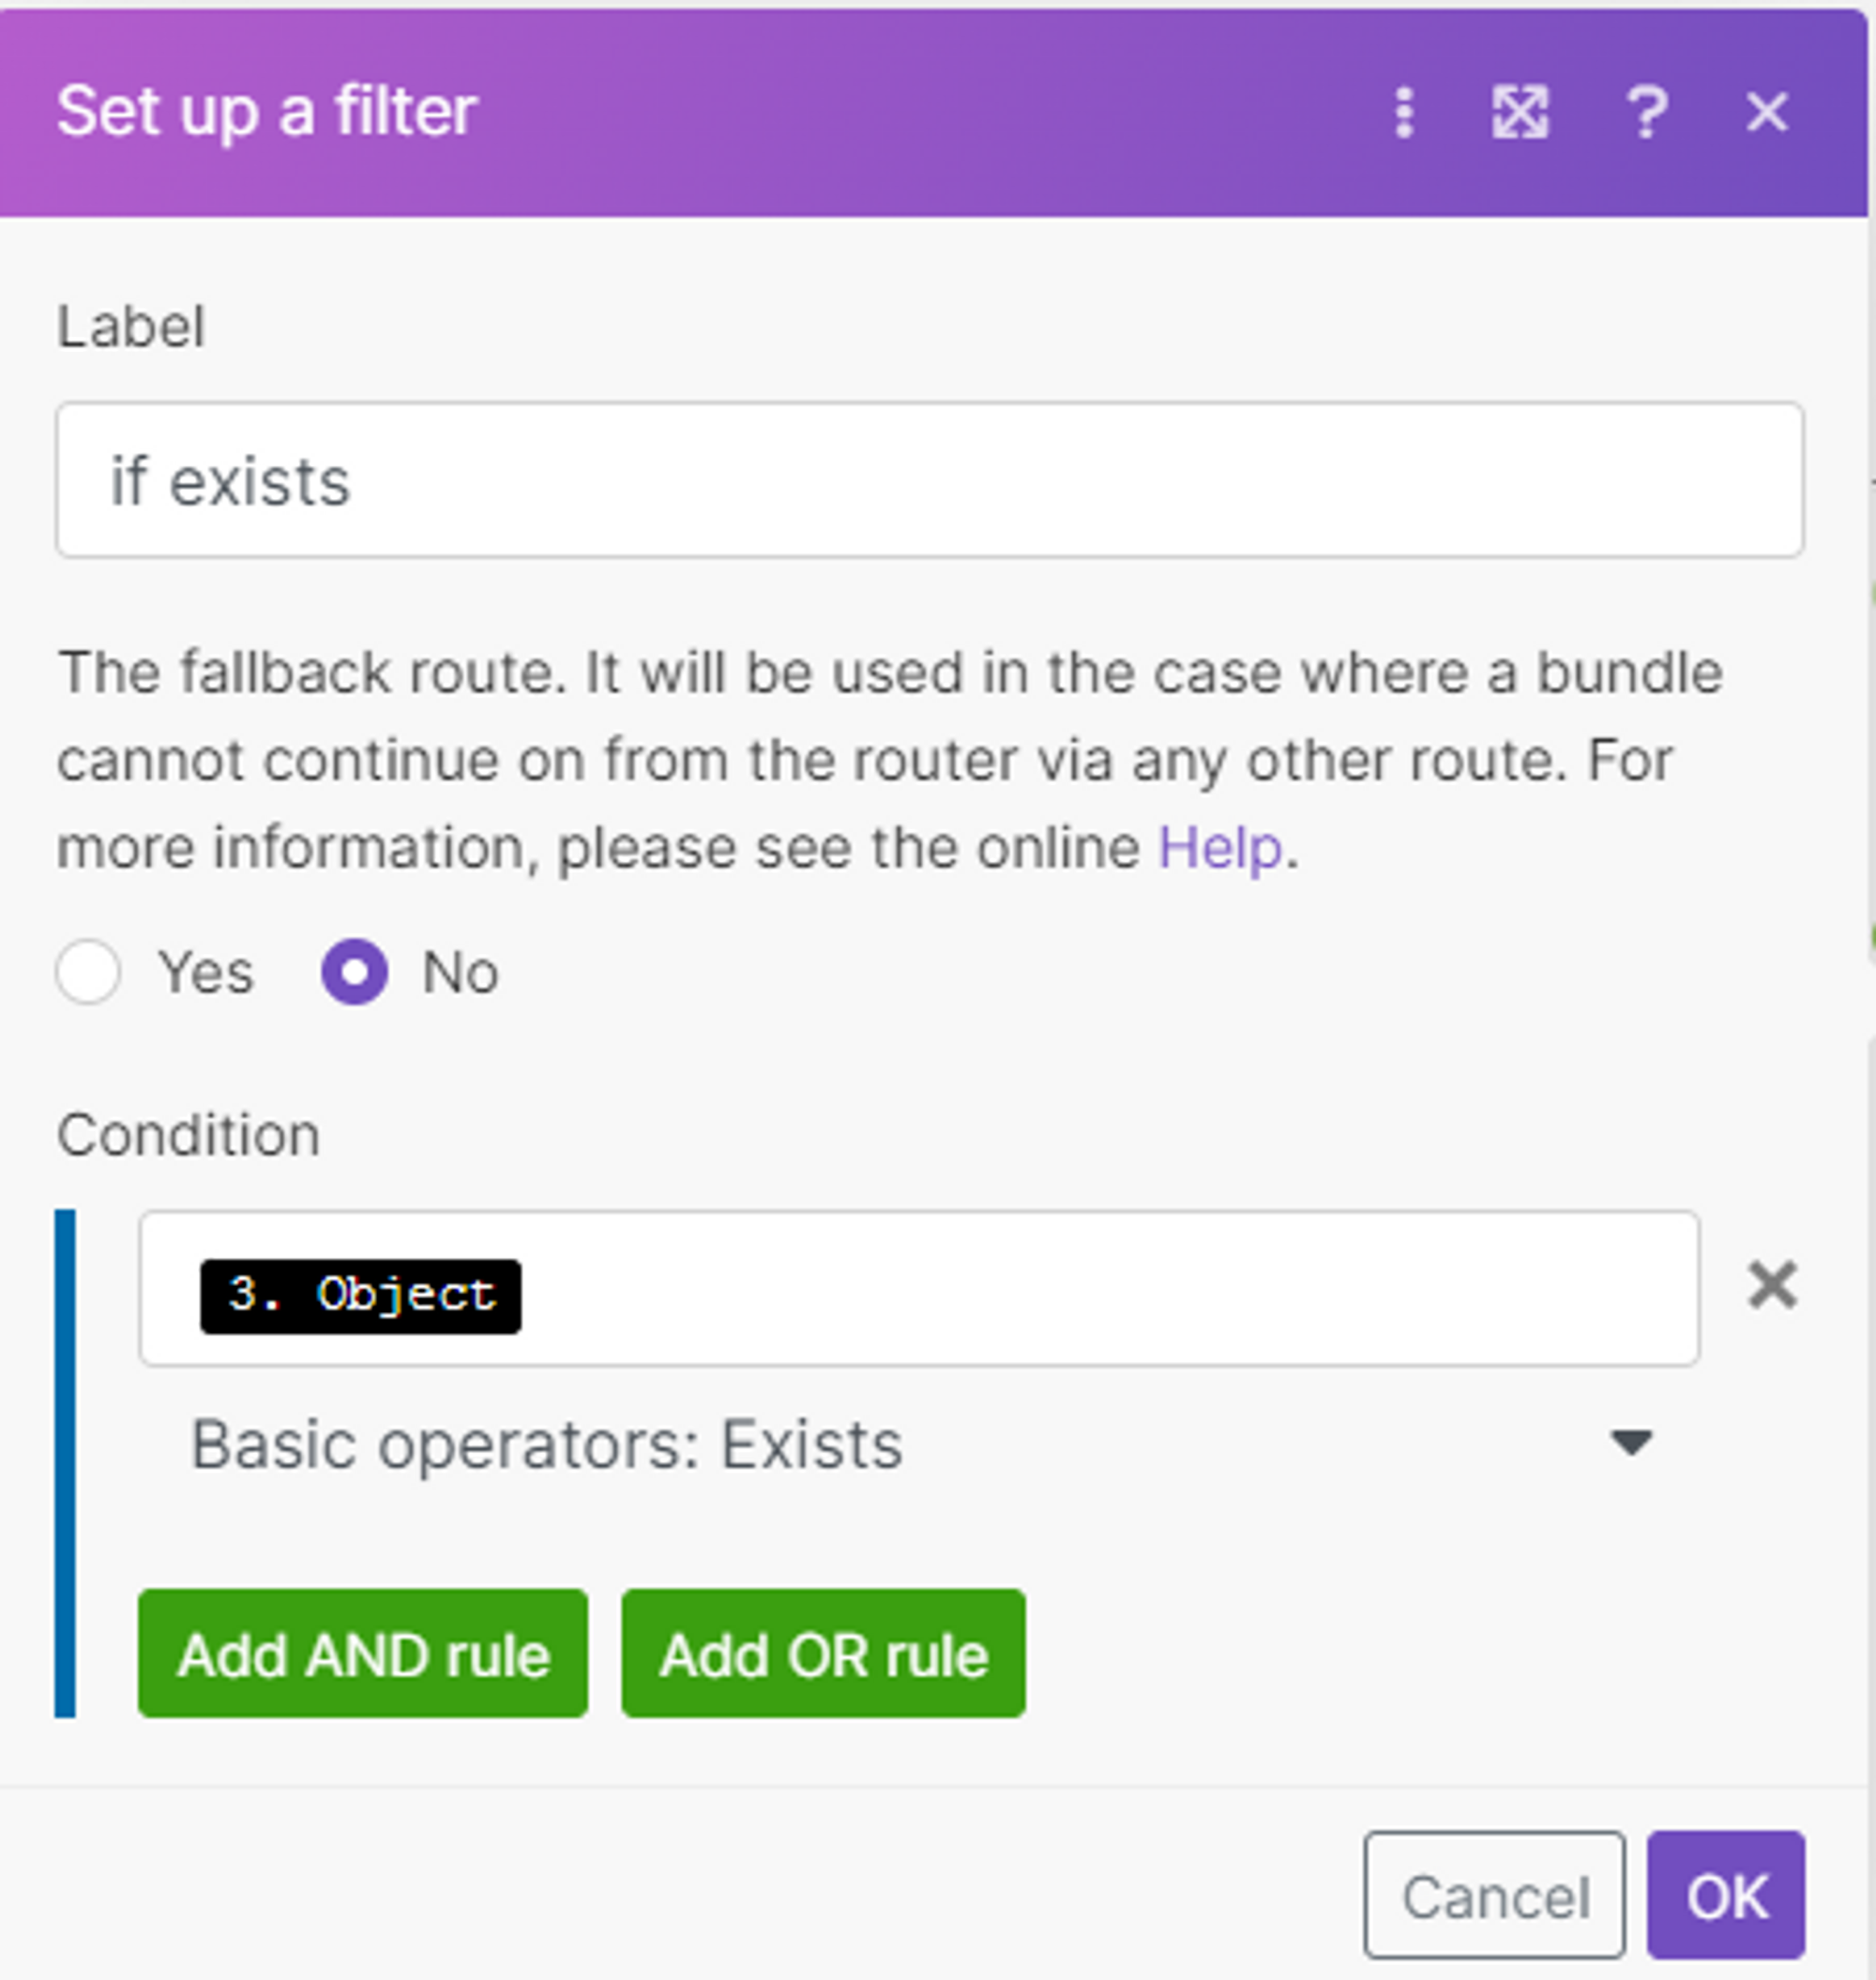
- Choose the & select Set up a filter️ Label = “if exist”️ Condition = 3. Object → “Basic Operators: Exists”
Final Steps
Access the clock next to the first module (Google Calendar) & set the scheduling (in minutes).️ The higher the number, the fewer “operations” (data) will be used by Make. It’s something to consider if you wish to stay on Make’s free plan (1000 ops/month).
Congrats! The scenario is finished, don’t forget to save it. Add a dummy event on your Google Calendar and run the scenario to see if it works (it works if you see your newly created event inside your Notion table). If it works, you can also increase the limit from the first module to 100 or whatever suits you.
Notion: A (very) brief overview
Before we get into using Notion with Google Calendar, let’s take a very brief look at what Notion it is and how it works. (If you’d like a less brief look, there’s a beginner’s guide to the tool here.)
In this post, I’m going to keep it as simple as possible: Notion was first designed as a codeless app-building tool. As a result, it’s unusual amongst modern software because it wasn’t designed to do anything in particular. Instead, it contains simple templates for functionality like Kanban boards, calendars, and databases, letting you build your own systems inside it.
The basic building blocks of Notion are the page, where everything happens, and the block, a section of a page. There are over 50 blocks, with everything from simple text to databases.
Notion combines a free link-based structure similar to the web with a more traditional hierarchical file structure. As a result, Notion makes it really easy to build workflows, knowledge bases, wikis, and a lot more—but it doesn’t necessarily excel any one of these things.
Let’s look at the calendar function inside Notion and compare it with G Suite’s offering.
How Do I Sync Notion With Google Calendar?
Google calendar may be the most used calendar application around the world. There are a huge benefits of using google calendar.
Notion user use calendar for may reasons. Basically they enjoy using calendar inside notion. But, many people who love to use notion and google calendar in a same time.
Here, the problem arise. There is no auto integration of google calendar inside notion. So, must setup manually inside notion. Although, the setup process is simple.
How To Setup Google Calendar In Notion?
To setup google calendar inside notion you have to follow some steps as below.
Google calendar embade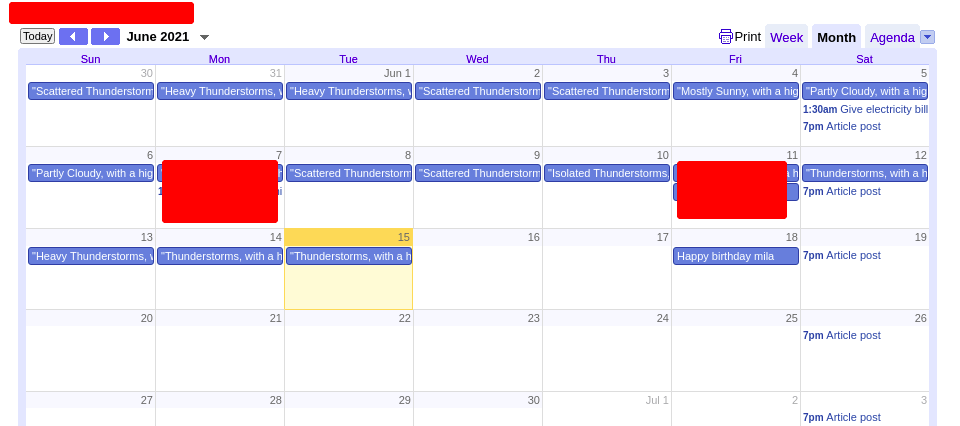
Google calendar embade in notion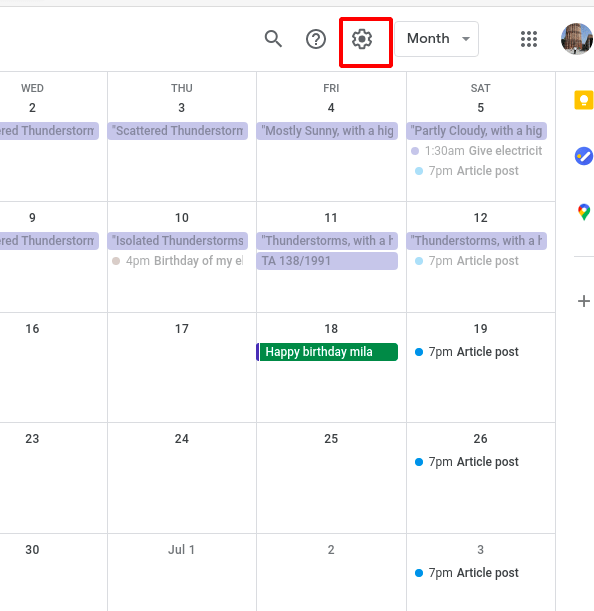
Google calendar settings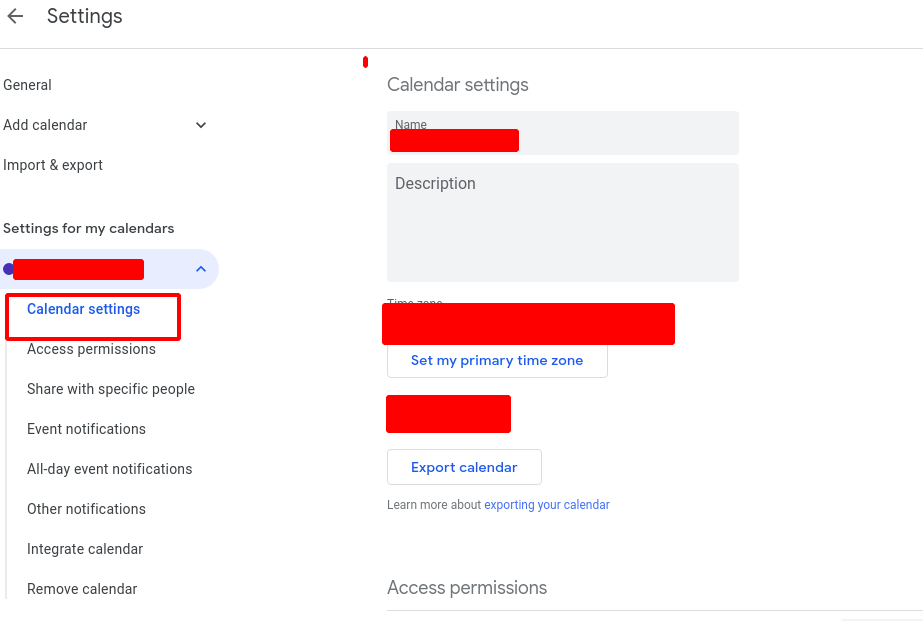
Google calendar settings inside
- At first, go to your google calendar. In google calendar you will see a settings option on the right side. (As like picture.)
- Go to your calendar section according to the picture.
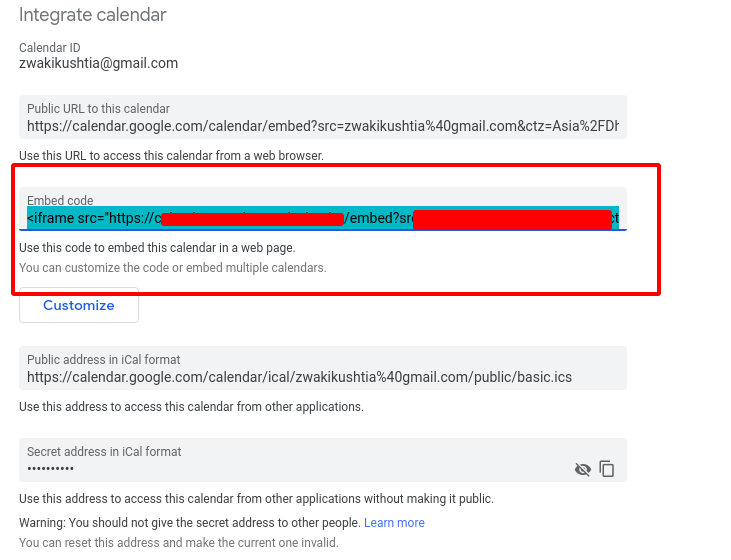
- Scroll down to the Integrate Calendar. Here you will see Embed Code. Copy the Embed Code.
- Now, Go to notion. Open a blank page. Just write “/embed” and hit the Enter button.
- At the end, pest the Google Calendar Embed Code. Now you can see your google calendar inside notion.
In google calendar inside notion you can edit, update, delete anything and the change will automatically update your main google calendar. Wow.
Встроить Календарь Google в Notion
Есть несколько способов добавить Календарь Google в Notion. Вы можете использовать официальный метод, который отлично работает для большинства. Опытные пользователи могут выбрать виджет Календаря Google из стороннего источника. Звучит запутанно? Поверьте, это проще, чем кажется. Начнем.
1. Agrega Google Calendar понятие
Во-первых, мы собираемся использовать официальный способ встраивания Календаря Google в рабочее пространство Notion.
Вы должны найти URL-адрес календаря, который хотите видеть в Notion. Это может быть что угодно, от личного календаря до общего календаря или главного календаря вашей компании. Дело в том, что каждый Календарь Google имеет общедоступный URL-адрес, который вы должны скопировать. Следуйте инструкциям ниже.
1.ПосещатьКалендарь Google в Интернете.
2.Войдите в систему, используя данные своей учетной записи Google.
3.На левой панели вы увидите все общедоступные и личные календари Google в своей учетной записи.
4.Щелкните меню из трех точек рядом с календарем, который вы хотите добавить в Notion.
5.Выберите «Настройки и общий доступ» в следующем меню.
6.В настройках календаря включитесделать доступным для общественностивменю «Права доступа».
7.Google выдаст предупреждение. Нажмите наХОРОШОпосле прочтения примечания ниже.
Использовать:Прежде чем вы нажмете «ОК», вам нужно понять, как это отразится на общедоступности Календаря Google. Этот метод предоставит доступ к календарю любому пользователю. Открытие календаря также делает его доступным для поиска Google, а это означает, что если в вашем календаре есть конфиденциальная или конфиденциальная информация, я настоятельно рекомендую вам НЕ разрешать общий доступ.
8.Затем нажмитеинтегрировать календарьна левой панели и скопируйте URL под заголовкомОбщедоступный URL этого календаря.
9.Откройте рабочую область Notion и выберите страницу, на которую вы хотите встроить Календарь Google.
10Использоватькоманда и типВстроитьи это позволит вам ввести URL.
11Вставьте URL-адрес, который вы скопировали на предыдущих шагах, и нажмите на кнопкувставить ссылкукнопка.
И вуаля! Теперь вы можете просматривать свой календарь Google прямо на странице Notion. Используйте боковые стрелки и измените размер в соответствии с вашими предпочтениями.
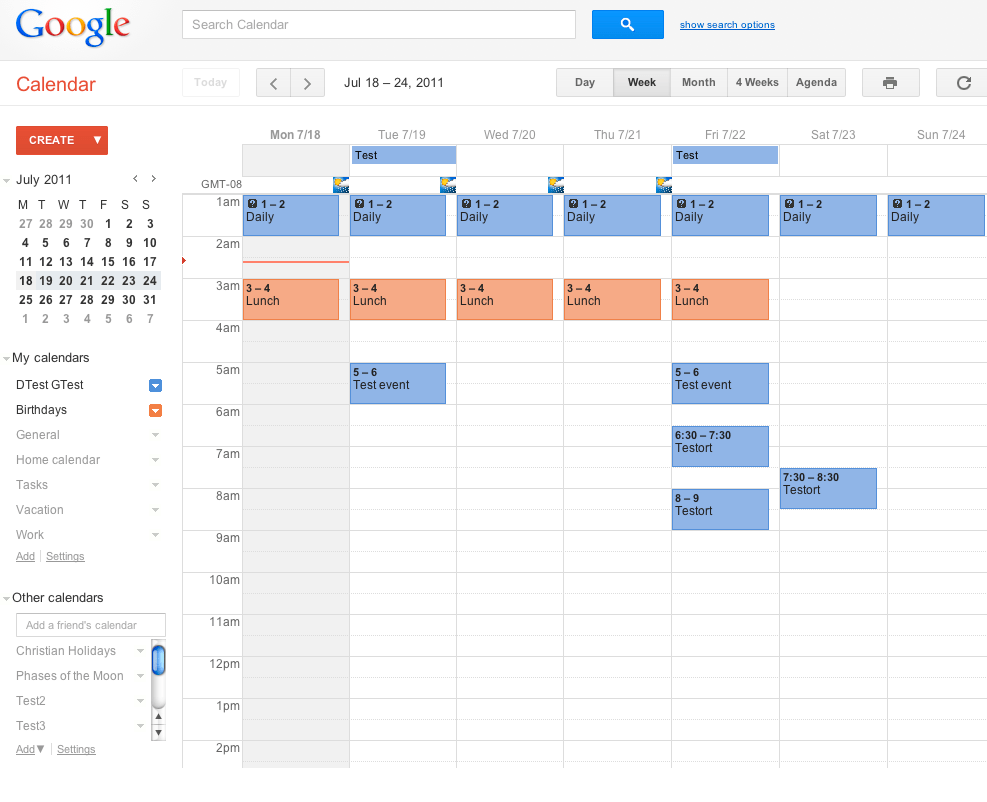
Вы должны увидеть добавленные записи календаря. Нажмите на запись, чтобы просмотреть дополнительные сведения, такие как время, место, полное название и т. д. Отсюда вы можете изменить представления по умолчанию на Неделя, Месяц или День, Вы также можете переключаться между предварительным просмотром следующей недели или месяца с помощью стрелок выше.
2. Добавьте виджет Календаря Google в Notion
По умолчанию Notion не предлагает способ использования виджетов на странице. Но это не остановило талантливых сторонних разработчиков от разработки решений.
В Интернете полно неофициальных виджетов Notion, которые помогают улучшить общую привлекательность страницы Notion. Среди них мы собираемся внедрить виджет Google Calendar от Indify. Следуйте инструкциям ниже.
1.ПосещатьУказыватьВ сети.
2.Войдите, используя данные своей учетной записи Google.
3.Найдите Календарь Google и откройте виджет.
4.В следующем меню войдите в систему, используя данные своей учетной записи Google.
5.Вы увидите предварительный просмотр Календаря Google в реальном времени на правой боковой панели.
6.Перед копированием ссылки на Календарь обязательно просмотрите все параметры настройки.
Например, вы можете выбрать представление календаря по умолчанию, цвет текста, отобразить границу события, установить цвет фона и многое другое. Я рекомендую вам просмотреть упомянутые варианты, чтобы получить наилучшее представление календаря.
7.Откройте рабочую область Notion и выберите страницу, на которую вы хотите встроить Календарь Google.
8.Используйте команду / и введитеВстроитьи это позволит вам ввести URL.
9.Вставьте URL-адрес, который вы скопировали на предыдущих шагах, и нажмите на кнопкувставить ссылкукнопка.
Вы успешно добавили виджет Календаря Google на страницу Notion.
Ограничения Календаря Google в понятии
- Вы не можете создать новую запись в Календаре Google из Notion. Он строго доступен только для чтения.
- Процесс синхронизации между Google Calendar и Notion займет некоторое время. Вам нужно будет вручную обновить страницу концепции, чтобы увидеть новые добавленные записи.
- Без интеграции с Gmail календарь Notion становится значительно менее полезным.
Посмотрите, что есть внутри
Стартовая страница Notion — это короткая инструкция на английском языке, и рядом с ней в боковом меню собрано несколько популярных шаблонов:
- Quick Note — формат короткой заметки;
- Personal Home — страница для организации домашних дел и развлечений;
- Task List — пространство для учёта и отслеживания дел;
- Journal — раздел для дневниковых записей;
- Reading List — шаблон библиотеки книг и другого контента.
Последняя кнопка Add a page открывает чистый белый лист с мигающим курсором.
Рекомендуем для начала поработать с шаблонами, попробовать разные функции и настроить их под себя. Создать заметку или библиотеку с чистого листа может быть увлекательно, но займёт больше времени, так как вам придётся самостоятельно изучать все мелкие и не всегда нужные настройки.
What else would you like to embed in Notion?
Plus makes it easy to get access to all of your data, where you need it. In addition to Google Calendar, you can use Plus to embed up-to-date Snapshots of tools like Google Sheets, GitHub, Hubspot, and more, directly within your Notion docs.
Here’s an example of my daily dashboard, which brings together my calendar with other widgets like headlines from The New York Times, financial market data from Koyfin, the weather from Google, a Seattle skyline webcam, and fitness data from Strava (as a reminder to go exercise!).
Plus makes it easy to get access to all of your information, wherever you need it. Try it out today!
Синхронизация заметок через сторонние приложения
Также вы можете установить одно из приложений для создания записей. В них предусмотрена синхронизация и есть настройки общего доступа к заметкам.
Что касается файловых менеджеров, то неверно считать, что они позволяют синхронизировать заметки: такие утилиты, как ES Проводник, FX File Explorer, Total Commander для Android и File Explorer, Documents или File Master для iOS позволяют сохранять записи для переноса или просмотра на других устройствах, но именно синхронизации в них нет.
Evernote
Evernote, несмотря на появление платной версии, все еще остается одним из самых популярных приложений для заметок, так как в нем много инструментов для организации работы в целом: задачи, поиск с помощью меток, функция копирования веб-страниц и возможность прикрепить к записям PDF-файлы, чеки, изображения и др. Программа работает на iOS, MacOS, Android и Windows.
Но синхронизировать заметки в бесплатной версии можно только на двух устройствах, на которые установлено приложение Evernote, например, ноутбук и смартфон. Если вам нужна синхронизация еще и с планшетом – придется завести платный аккаунт (от 219 рублей в месяц) либо редактировать заметки из браузера.
OneNote
Заметки OneNote экосистемы Microsoft также можно использовать для синхронизации записей на разных гаджетах. Для этого установите приложение OneNote (есть для ОС Windows, MacOS, Android, iOS) или откройте сервис в браузере.
Для хранения записных книжек используется OneDrive, так что понадобится аккаунт и в этом сервисе. Если у вас установлена Windows 10, то сохранение происходит автоматически. Для более ранних версий и других ОС придется вручную импортировать записные книжки в OneDrive.
- Откройте записки на компьютере, нажмите «Файл» – «Общий доступ».
- Выберите OneDrive в качестве расположения для записной книжки или кликните «Добавить место» и войдите в OneDrive.
- Введите имя для записной книжки и нажмите «Переместить записную книжку», после чего заметки перенесутся с локального устройства (компьютера) в OneDrive.
- В iOS при запуске приложения OneNote все записи будут по умолчанию синхронизироваться с OneDrive.
- На Android-устройстве нужно открыть приложение OneNote и в левом нижнем углу тапнуть на пункт «Записные книжки», после чего в разделе «Дополнительные параметры» выбрать «Синхронизировать все».
Теперь при входе в учетную запись в браузере или в приложение OneNote на ПК вы увидите заметки, созданные на смартфоне. Их можно отредактировать или добавить новые – все изменения отобразятся на мобильном устройстве.
SimpleNote
Менеджер заметок SimpleNote работает на Android, Windows, Linux, iOS, MacOs – записи синхронизируются на всех устройствах и доступны для просмотра и редактирования. К заметкам можно добавить теги, по которым их удобно искать и объединять в тематические блоки.
Также SimpleNote поддерживает разметку Markdown, позволяющую с помощью простых обозначений добавлять форматирование, которое сохраняется при экспорте файла в другие программы. То есть запись с заголовками, курсивом и иными элементами, внесенными при помощи Markdown, можно перенести, например, в Word или PDF, не теряя форматирования.
Яндекс.Заметки
Яндекс.Заметки входит в состав сервиса Яндекс.Диск, который работает на iOS, Android, Windows, MacOS и Linux. Также доступ к заметкам можно получить из браузера и из Яндекс.Почты. Вот как это сделать:
- Установите на устройство Яндекс.Почту или Яндекс.Диск и войдите в свой аккаунт.
- В левом нижнем углу экрана нажмите на значок «Еще» – откроются сервисы Яндекса.
- Откройте вкладку «Заметки» и добавьте новую запись.
Все записи будут автоматически сохраняться на Диске, их можно добавлять, редактировать и удалять – изменения появятся на всех гаджетах. Но если редактировать одну и ту же запись с нескольких девайсов одновременно, то сервис создаст ее копию. В ней сохранятся изменения с одного устройства, а в оригинале – с другого.
Dropbox Paper
Для синхронизации заметок через Dropbox понадобится утилита Paper, в которой можно открывать, удалять, создавать и редактировать тексты на смартфоне, в приложении на ПК или через браузер в аккаунте Dropbox. Синхронизация происходит автоматически на всех устройствах, где вы зашли в учетную запись.
У заметок в Paper широкие возможности форматирования: можно добавлять таблицы, иллюстрации и файлы мультимедиа, писать код
Также в приложении есть инструменты для совместной работы: любую заметку можно открыть и редактировать нескольким пользователям, написать к ней комментарий и отметить в нем коллегу, чтобы привлечь его внимание